
Welcome to Consam, a clean, modern WordPress theme for consulting firms, agencies, finance advisors and corporate businesses. It is built with Elementor and ships 9 home layouts, services, case studies, team, pricing, blog and shop pages. Thank you for choosing it!
Install the themeUpload, activate and install the plugins.Import a demoOne click, 9 home pages to choose from.Header & Footer BuilderHeaders, footers, breadcrumbs, mega menus, offcanvas.Video guidesWatch each builder part step by step.
Before you install Consam, make sure your server meets these requirements. Always use the latest stable WordPress version.
More about server requirements: WordPress hosting handbook.
For Elementor editing and the demo import to work smoothly, set these values in your hosting PHP configuration (ask your host if you cannot change them):
        max_execution_time = 300
        max_input_time = 300
        max_input_vars = 3000
        memory_limit = 256M
        post_max_size = 128M
        upload_max_file_size = 128M
After purchasing Consam, download the full package from the Downloads page of the marketplace account you bought it with. The package contains:
Short videos (about one minute each) show every builder part from start to finish: create the template, design it, use it on the whole site, use a different one on one page, and change it later. Each video is also in its own section below.
Header59 secondsFooter52 secondsBreadcrumb50 secondsMega Menu47 secondsOffcanvas47 seconds
Important! Upload consam.zip, not the whole downloaded package. Uploading the package gives the error “The package could not be installed. The theme is missing the style.css stylesheet.”
Navigate to DashboardAppearanceThemesAdd New ThemeUpload Theme and follow these steps:
Navigate to DashboardAppearanceInstall Plugins and follow these steps:
After activation a notice asks you to install the plugins the theme uses. Select them all, choose Install, then Activate:
There are two ways to import the demo. Use Automatic Import on a fresh site. Use Manual Import only if the automatic import fails.
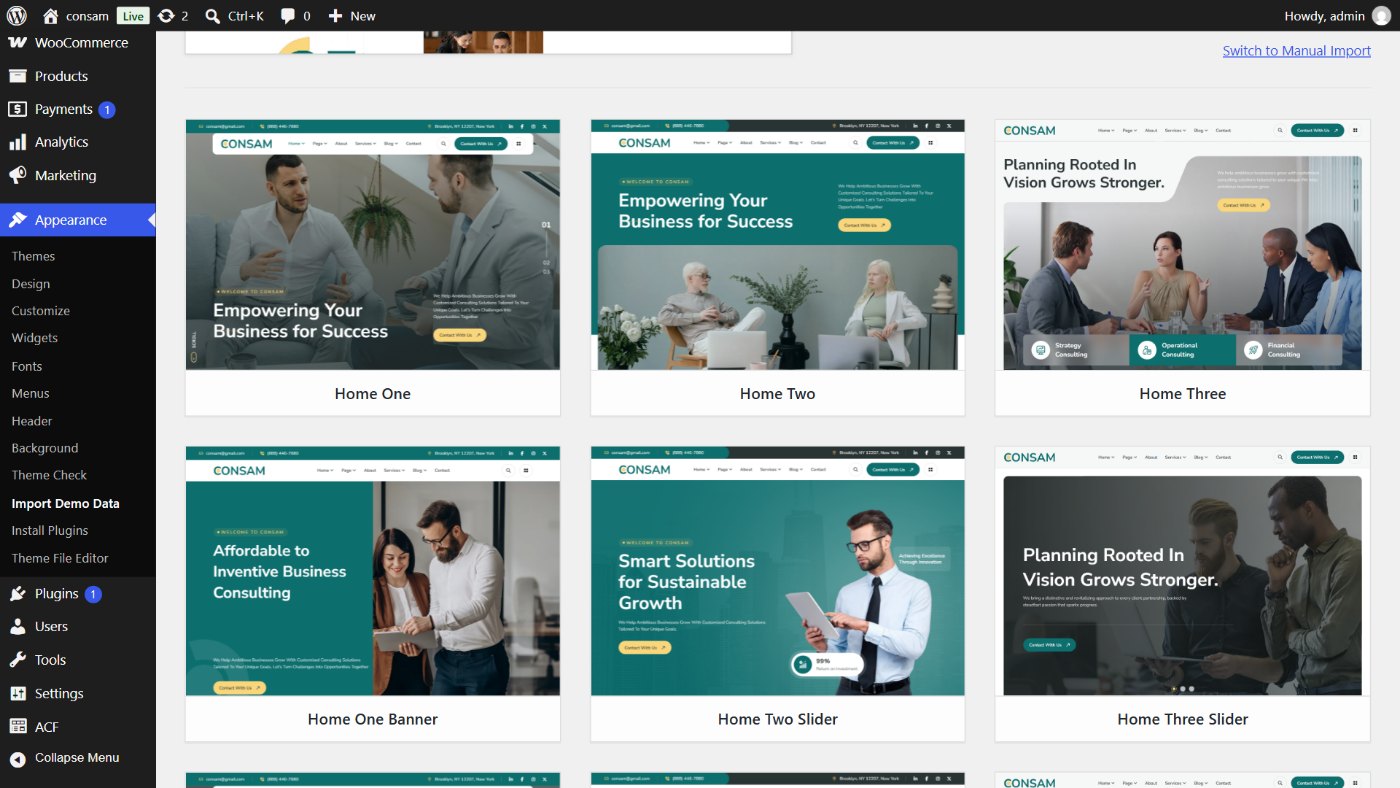
Navigate to DashboardAppearanceImport Demo Data and follow these steps:
Pick the home page you like and click Import. The importer adds the demo pages, posts, services, case studies, products, forms, the header and footer templates, the widgets and the Customizer settings, then sets the menu, the front page, the blog page and the shop pages for you. Every home page is a separate demo:
The import can take a few minutes (it downloads the images). Keep the tab open until the success message shows.
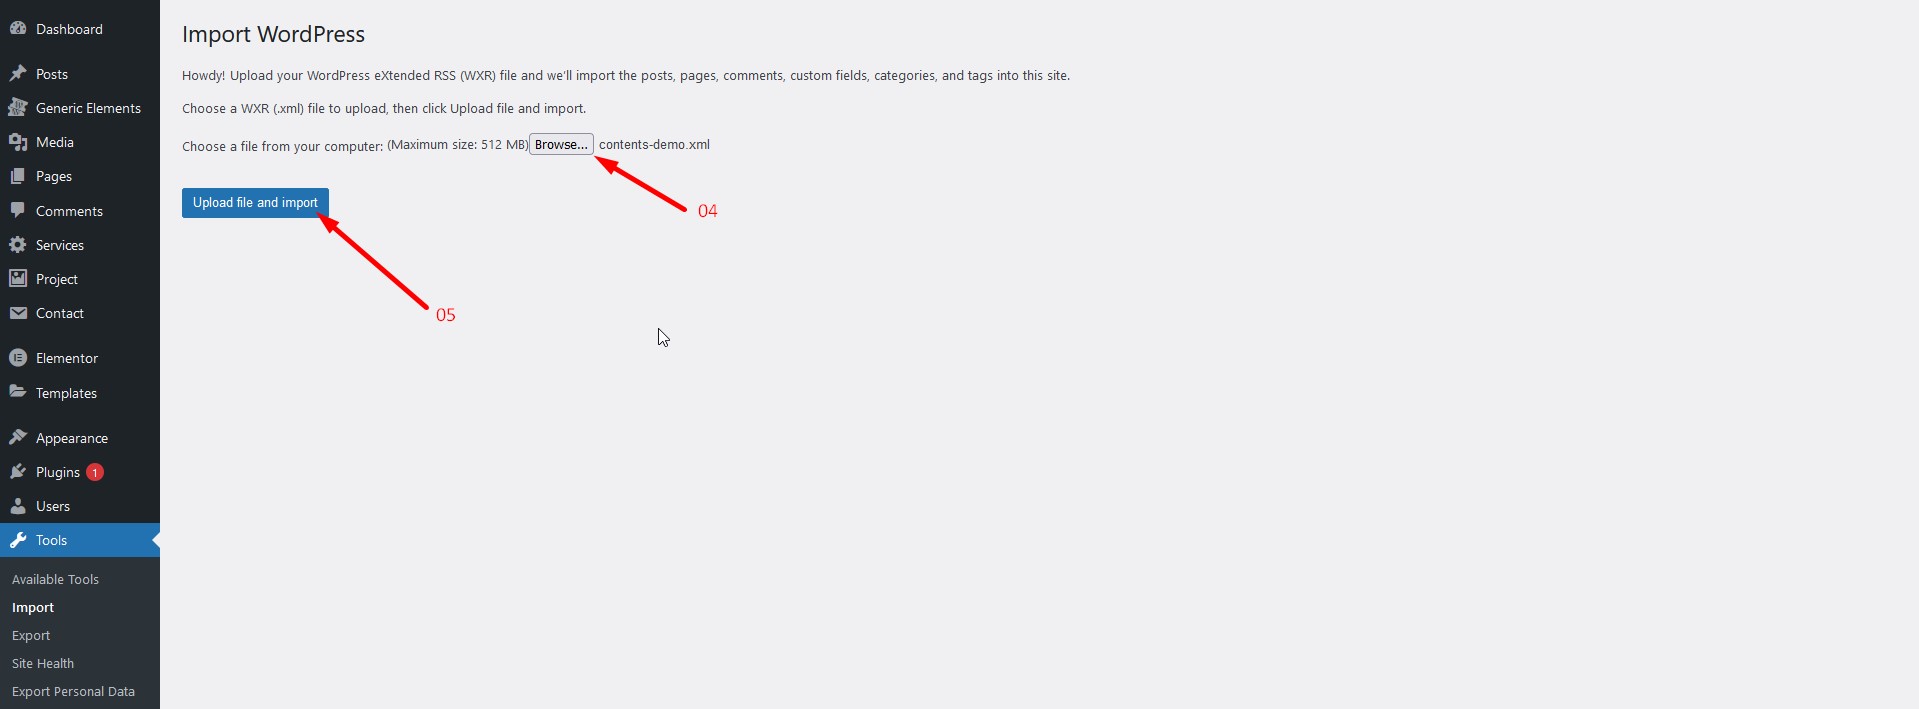
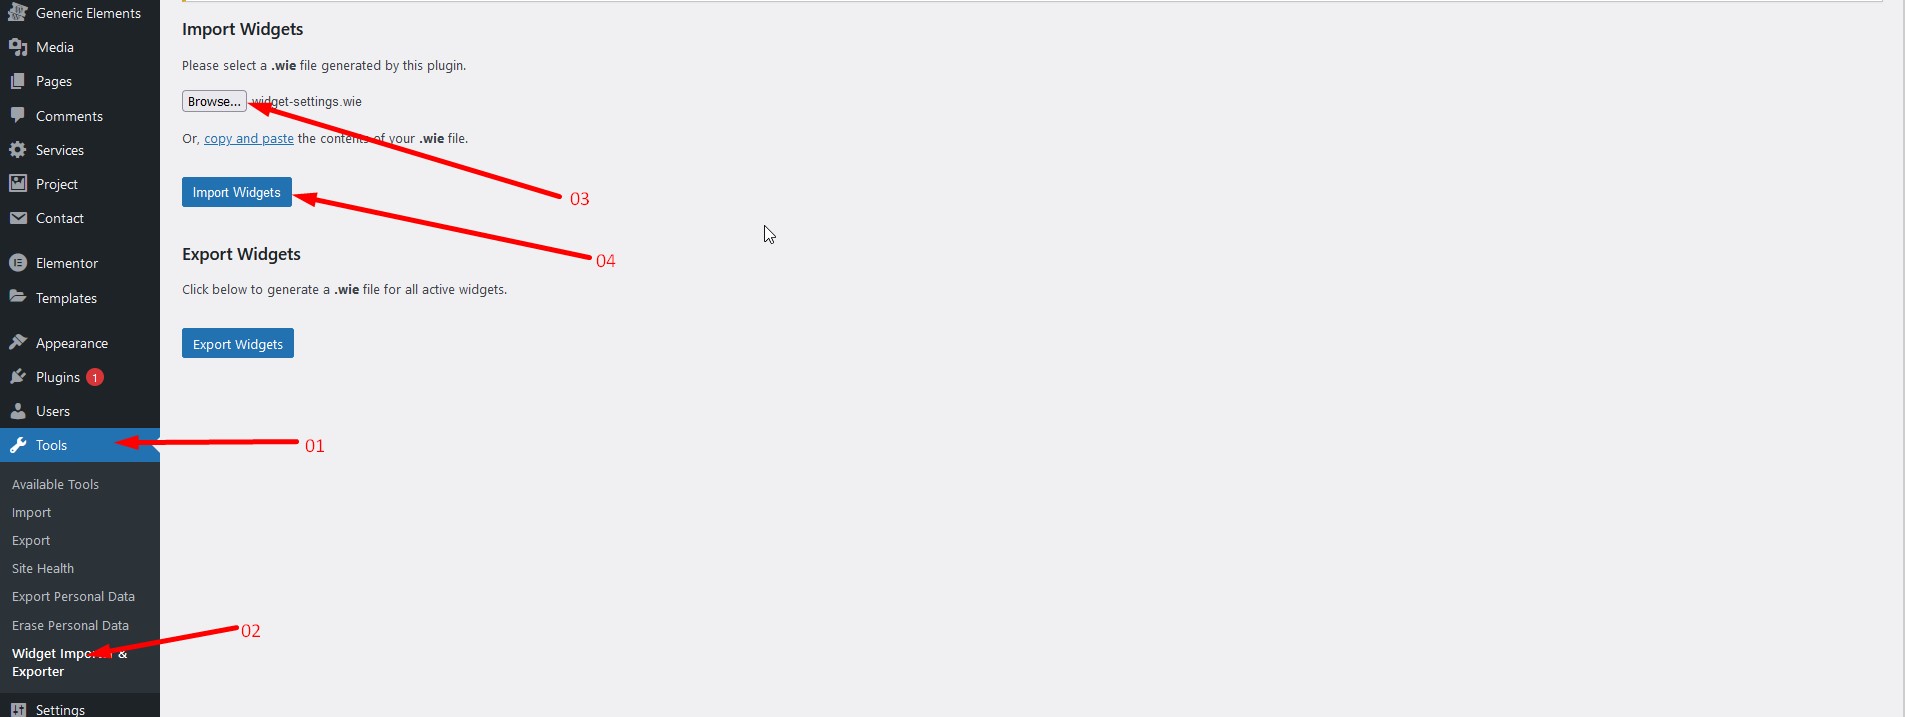
The demo files are in the sample-data folder of the theme.
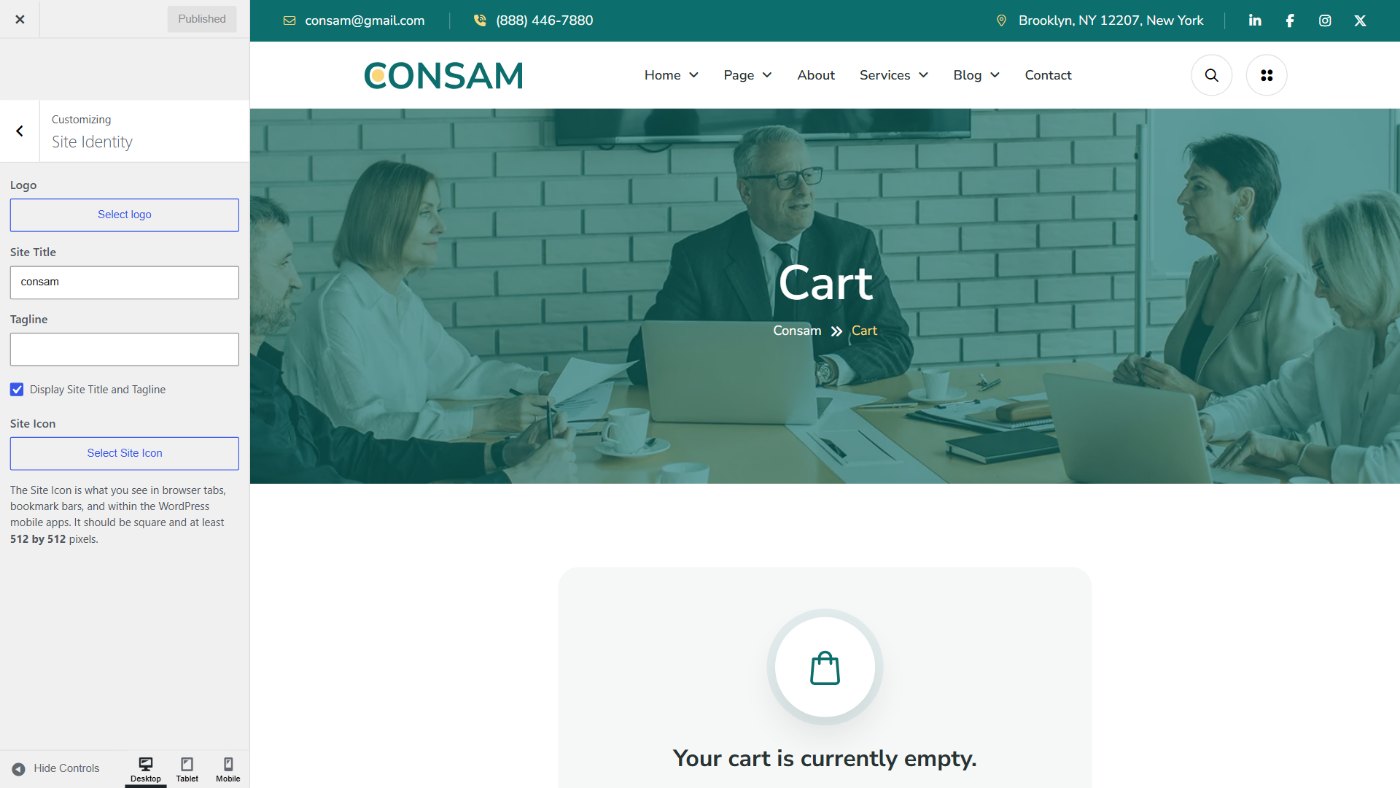
Navigate to DashboardAppearanceCustomizeSite Identity and follow these steps:
Set the site title, tagline and site icon (favicon). The header logos are set in Header Settings.
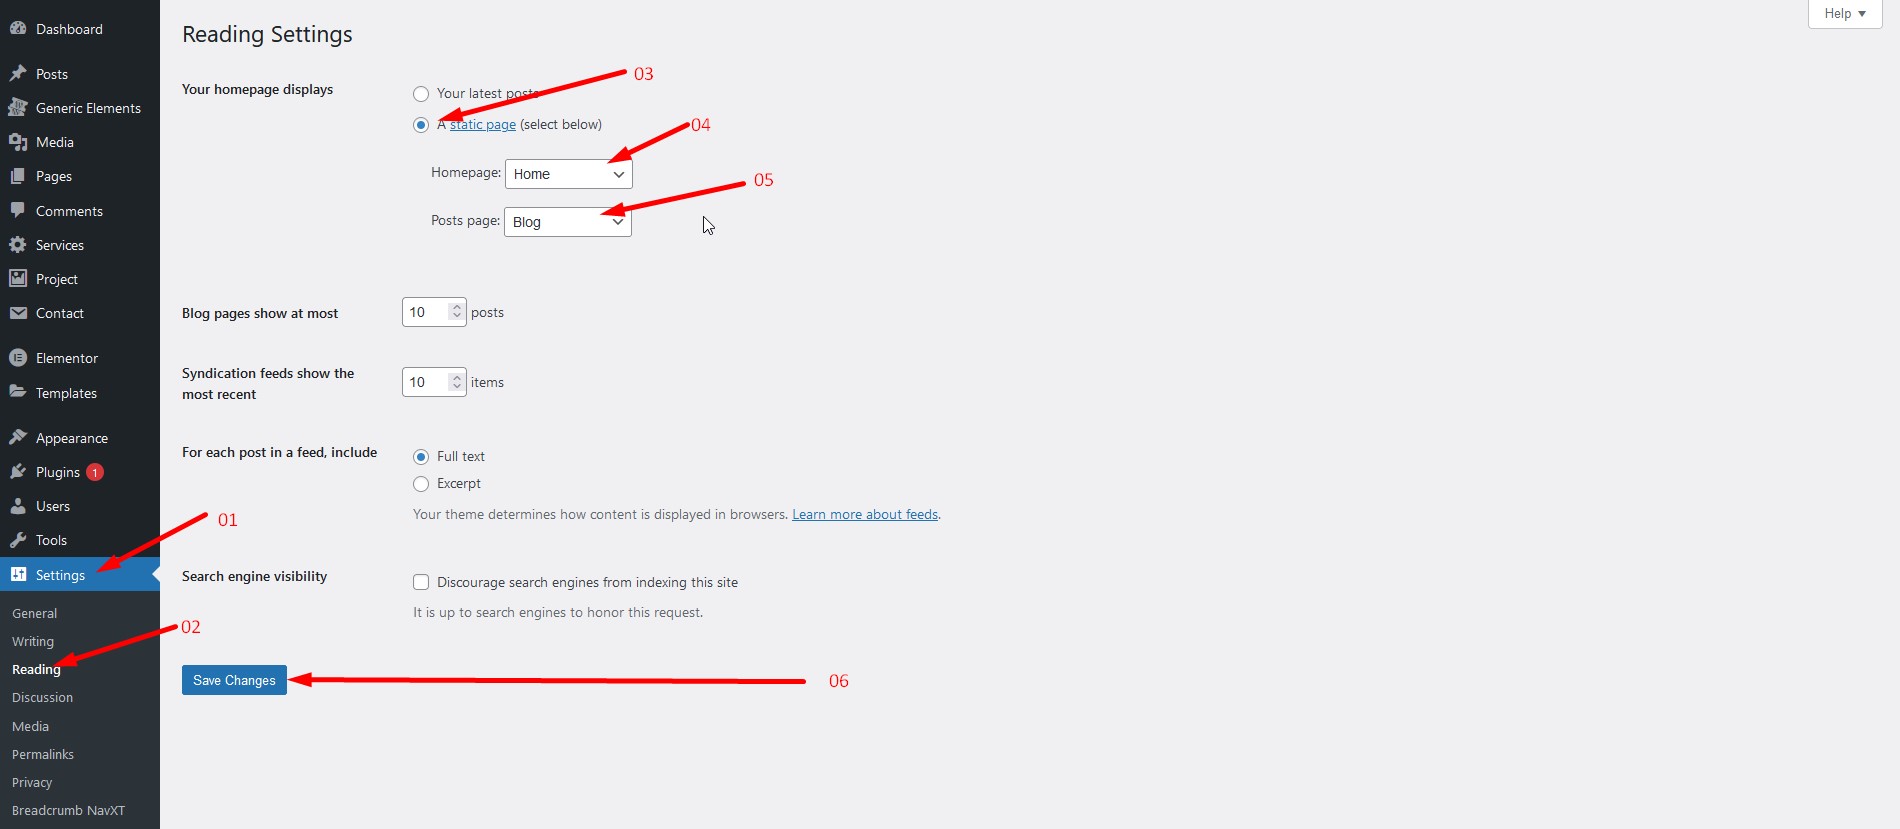
Navigate to DashboardSettingsReading and follow these steps:
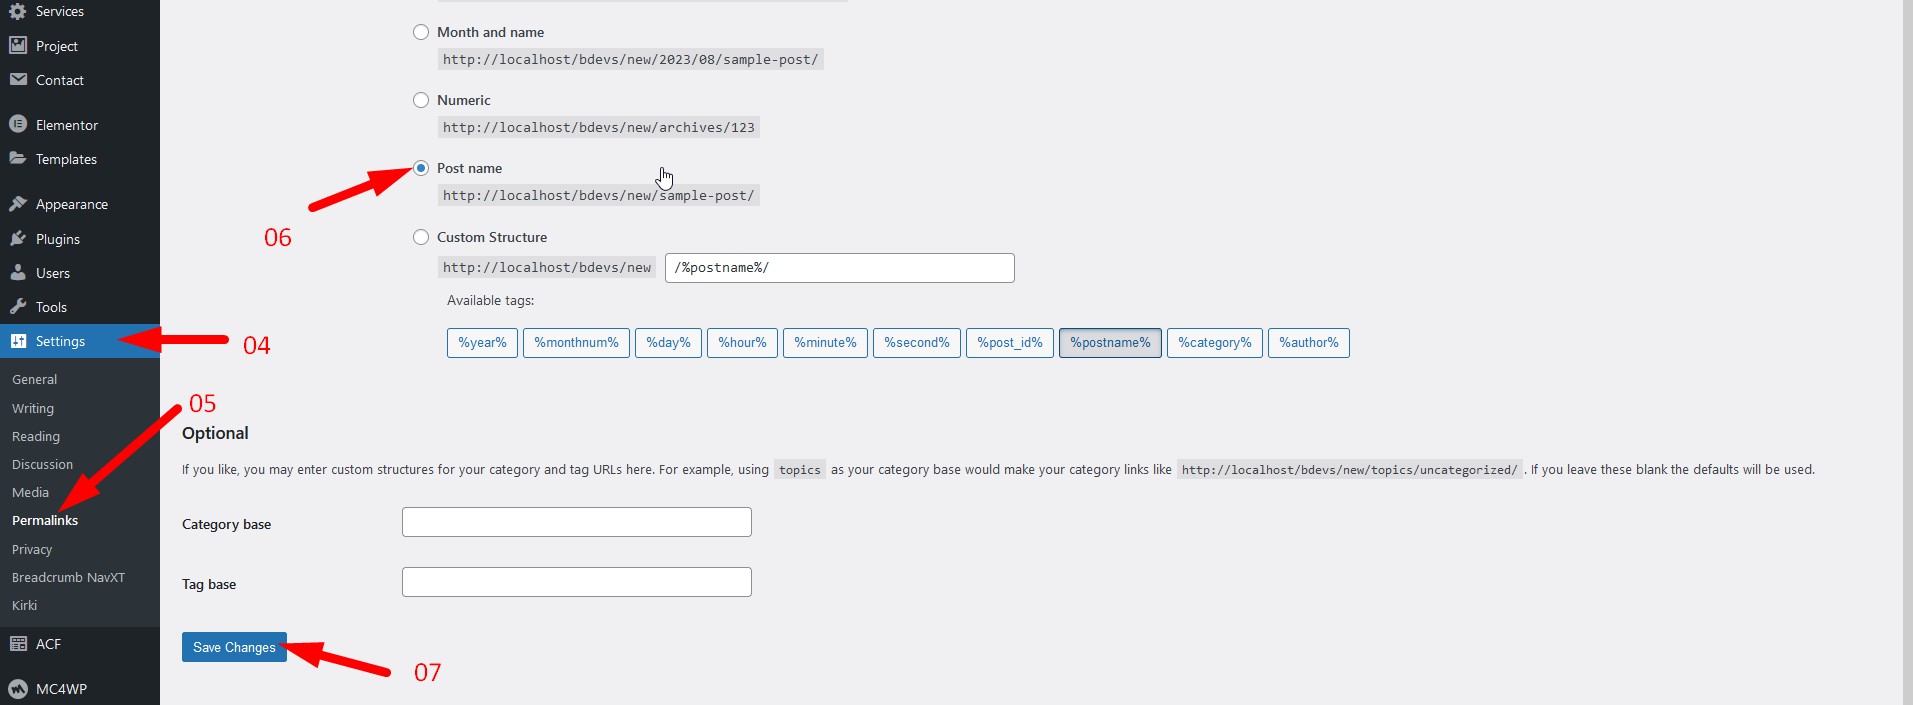
Navigate to DashboardSettingsPermalinks and follow these steps:
Choose Post name and click Save Changes.
All theme settings are in one Customizer panel: Appearance → Customize → Consam Customizer. Changes show in the live preview on the right; click Publish to save them.
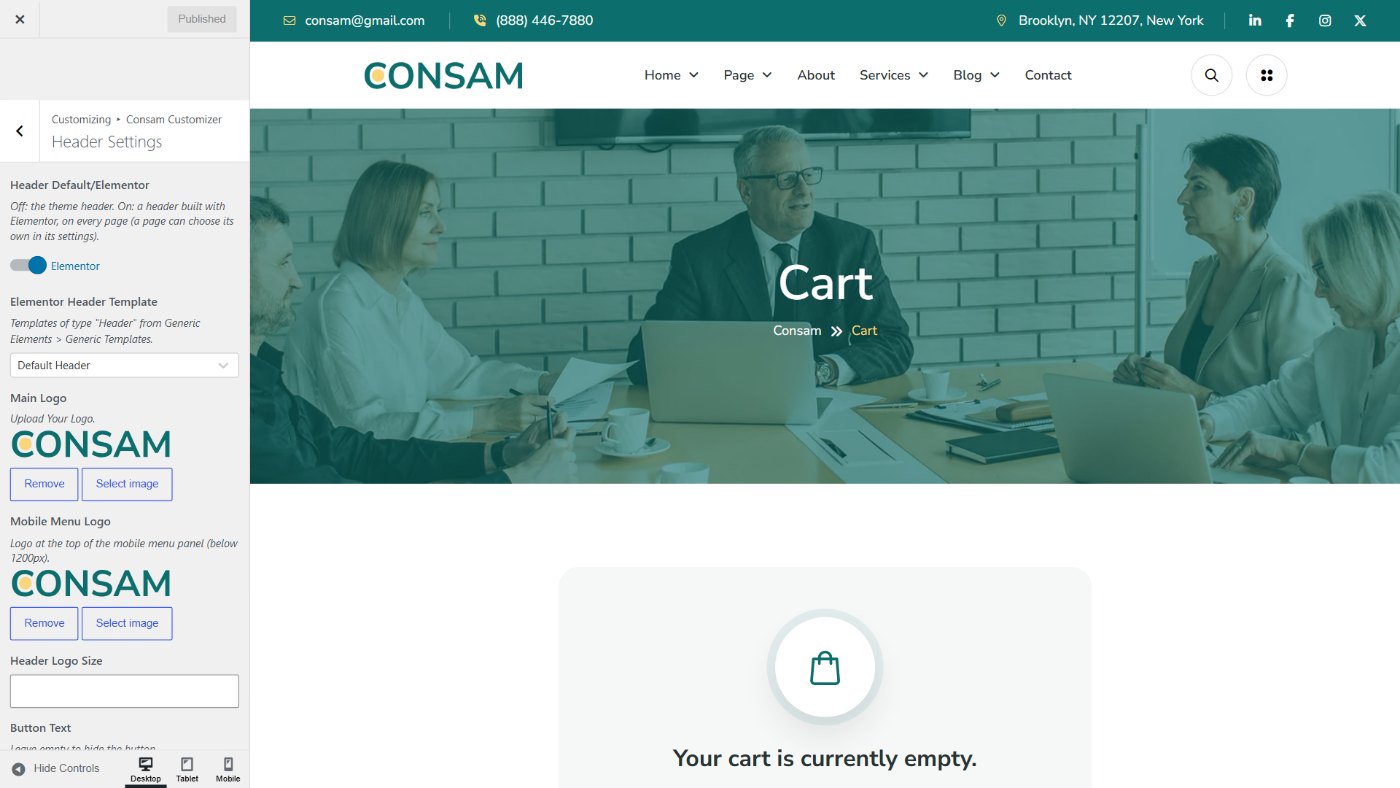
Navigate to DashboardAppearanceCustomizeConsam CustomizerHeader Settings and follow these steps:
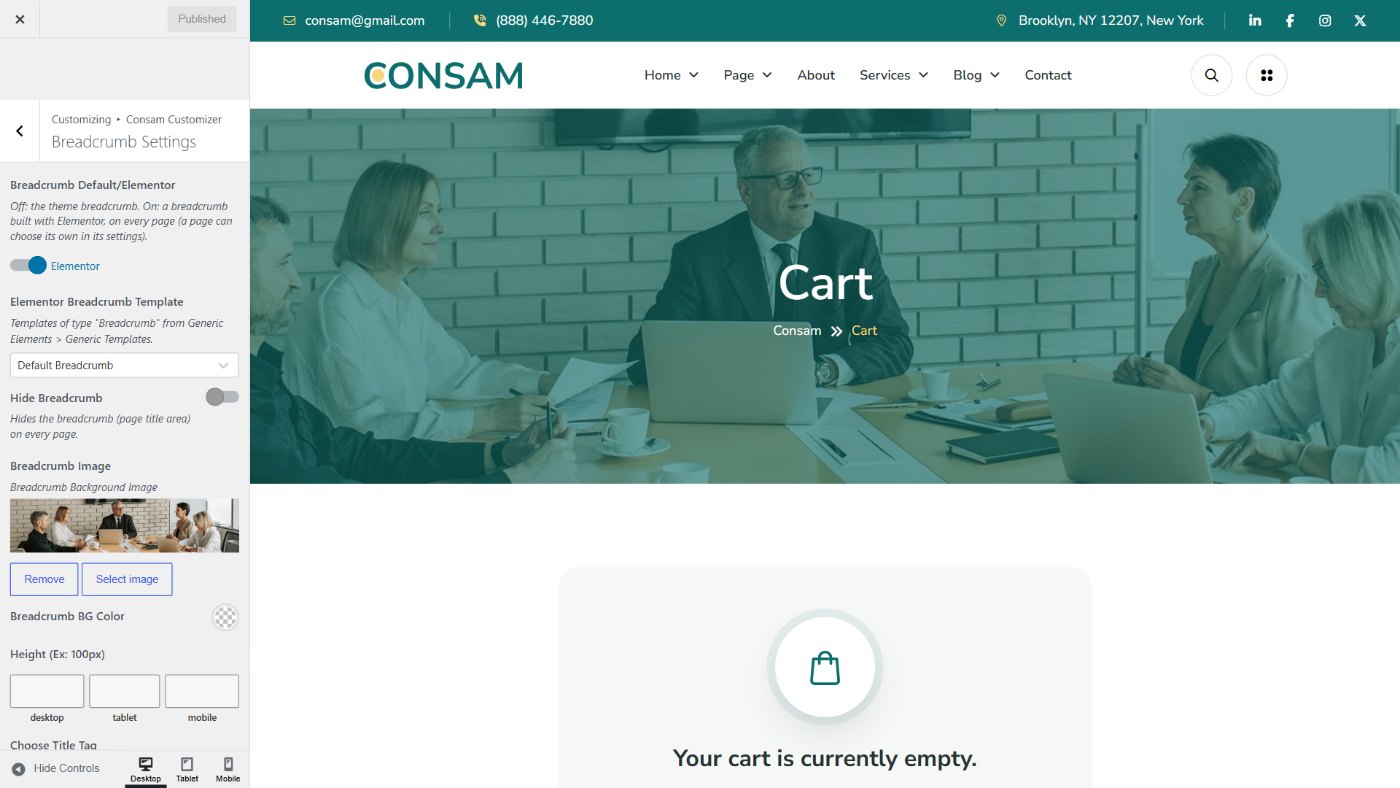
Navigate to DashboardAppearanceCustomizeConsam CustomizerBreadcrumb Settings and follow these steps:
Navigate to DashboardAppearanceCustomizeConsam CustomizerBlog Archive Settings and follow these steps:
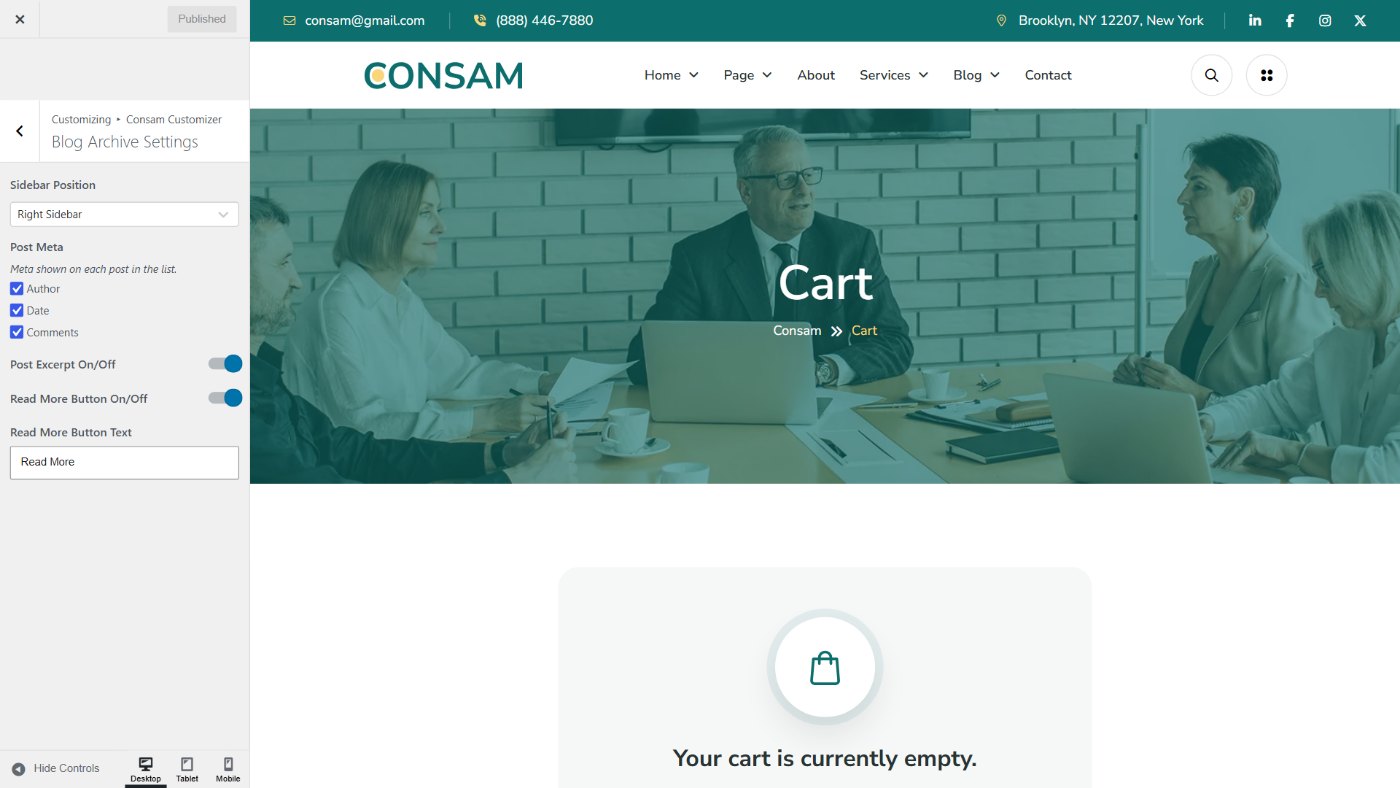
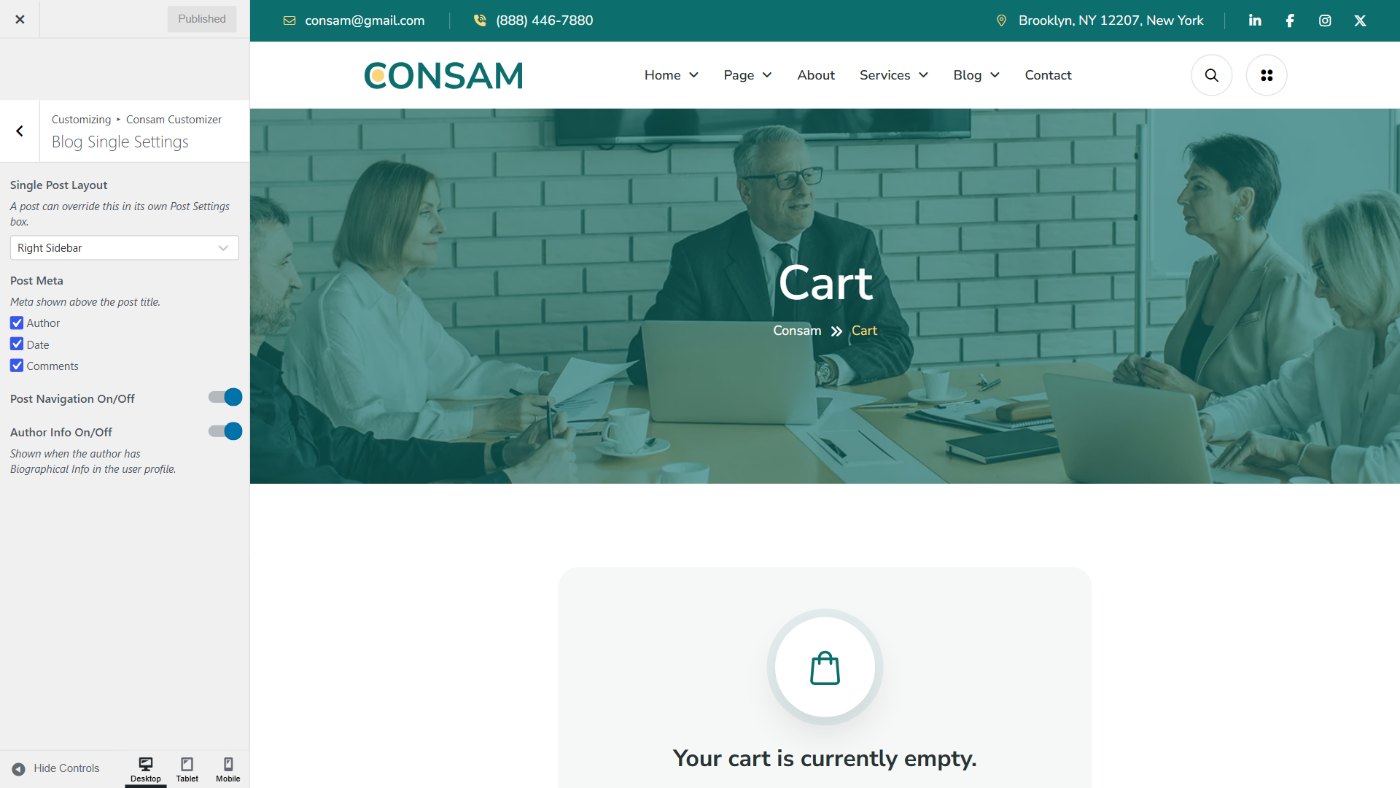
Navigate to DashboardAppearanceCustomizeConsam CustomizerBlog Single Settings and follow these steps:
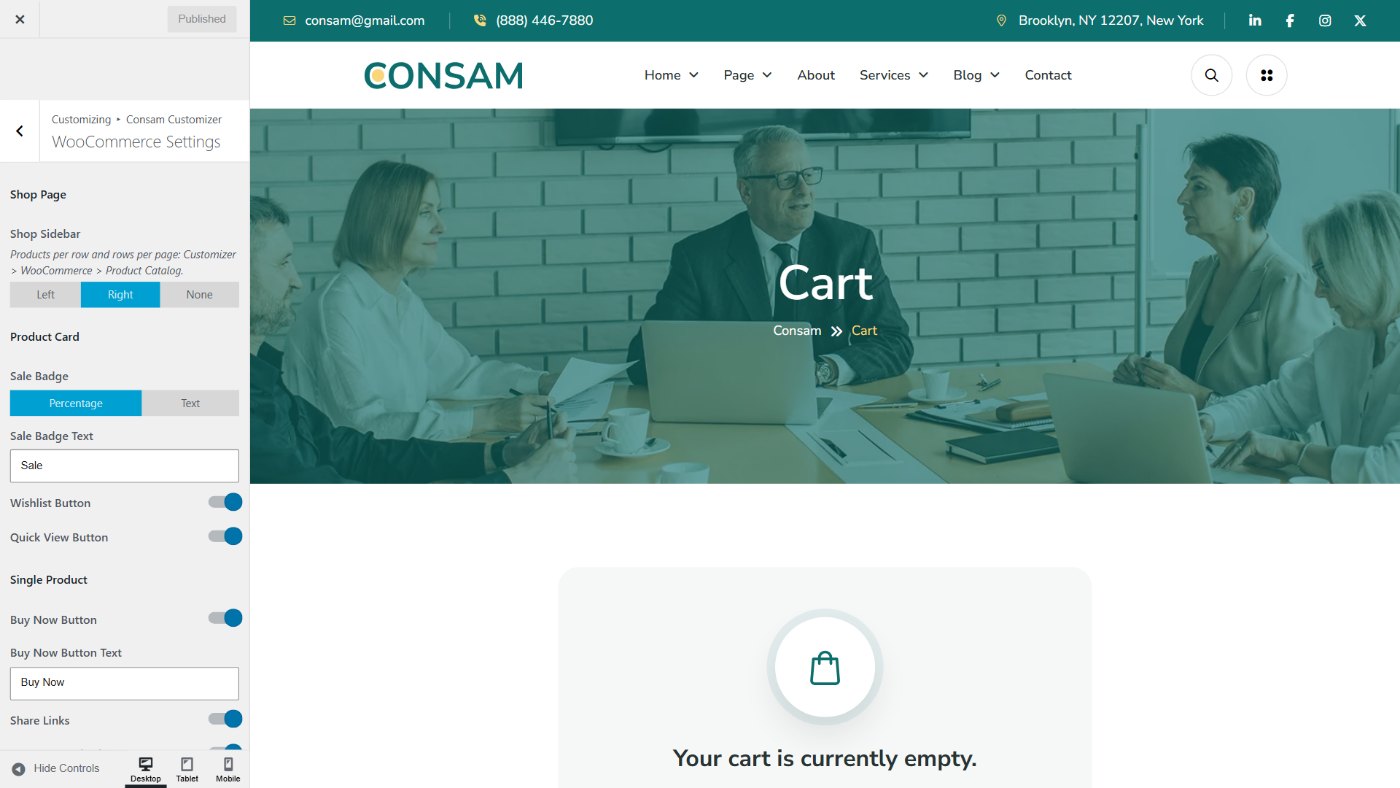
Navigate to DashboardAppearanceCustomizeConsam CustomizerWooCommerce Settings and follow these steps:
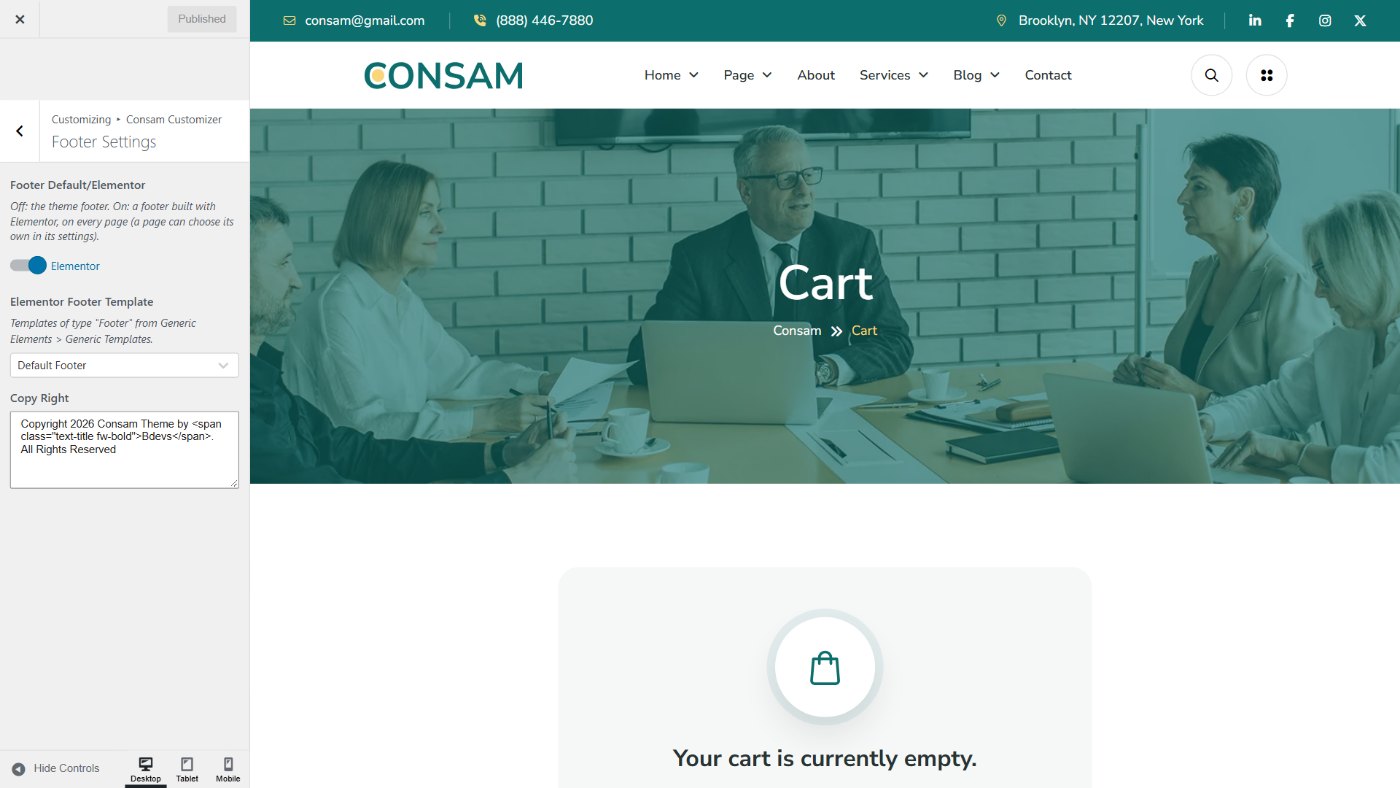
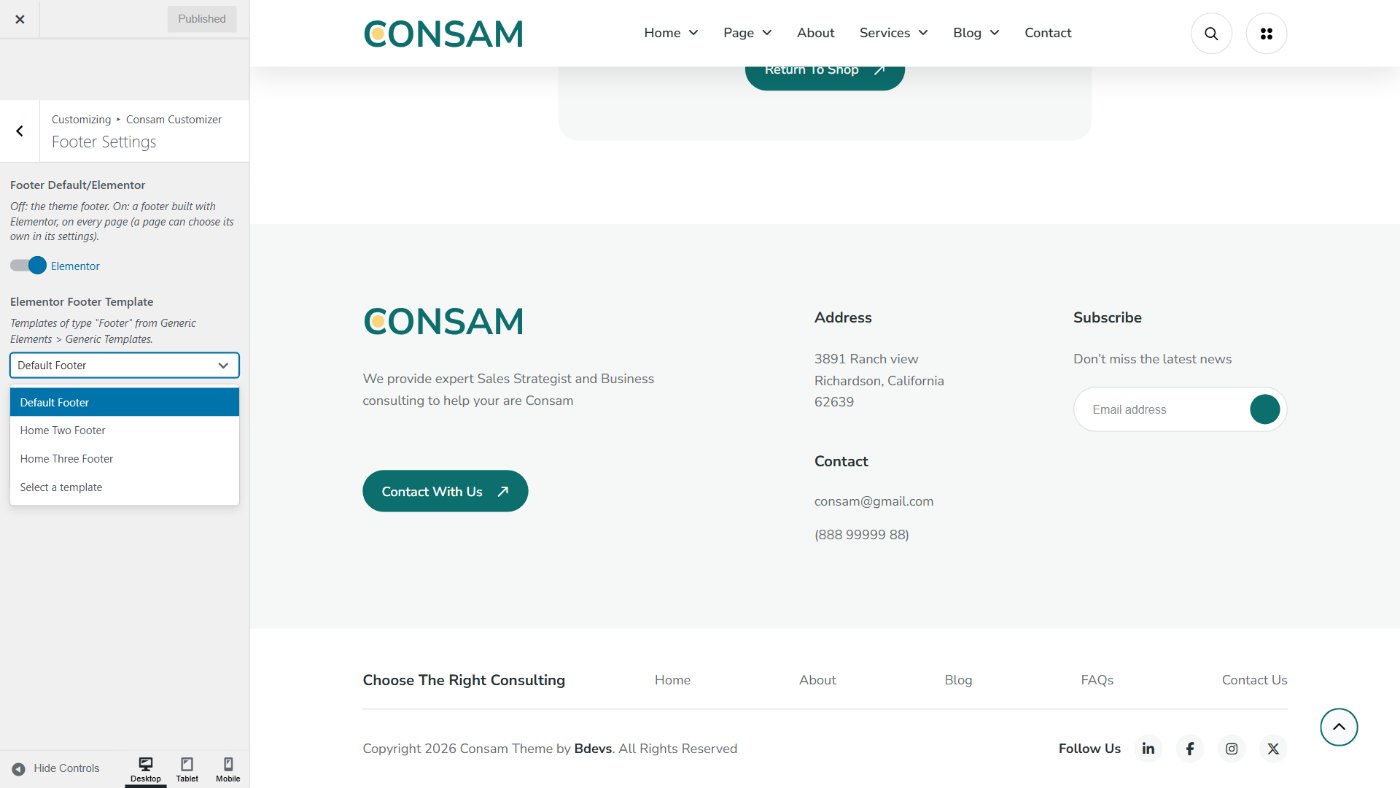
Navigate to DashboardAppearanceCustomizeConsam CustomizerFooter Settings and follow these steps:
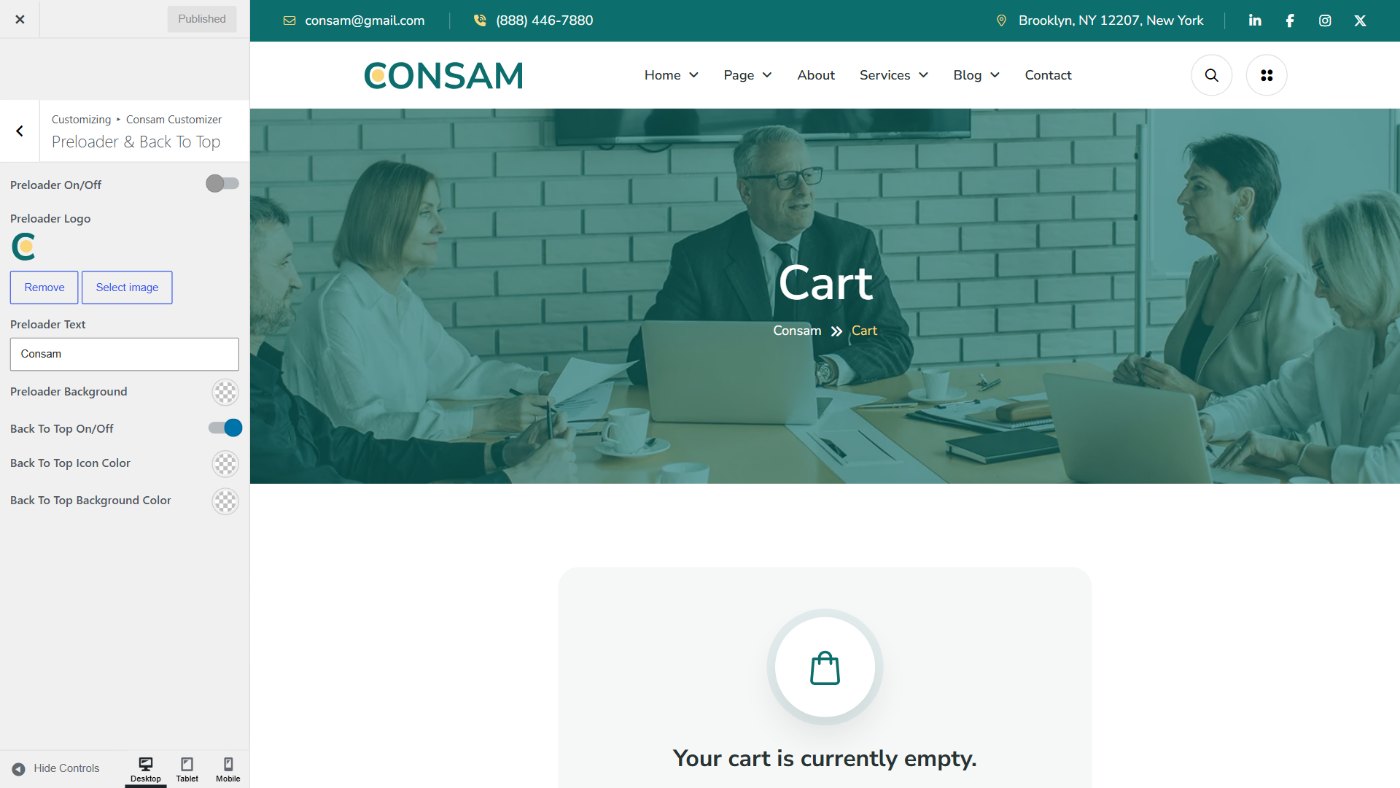
Navigate to DashboardAppearanceCustomizeConsam CustomizerPreloader & Back To Top and follow these steps:
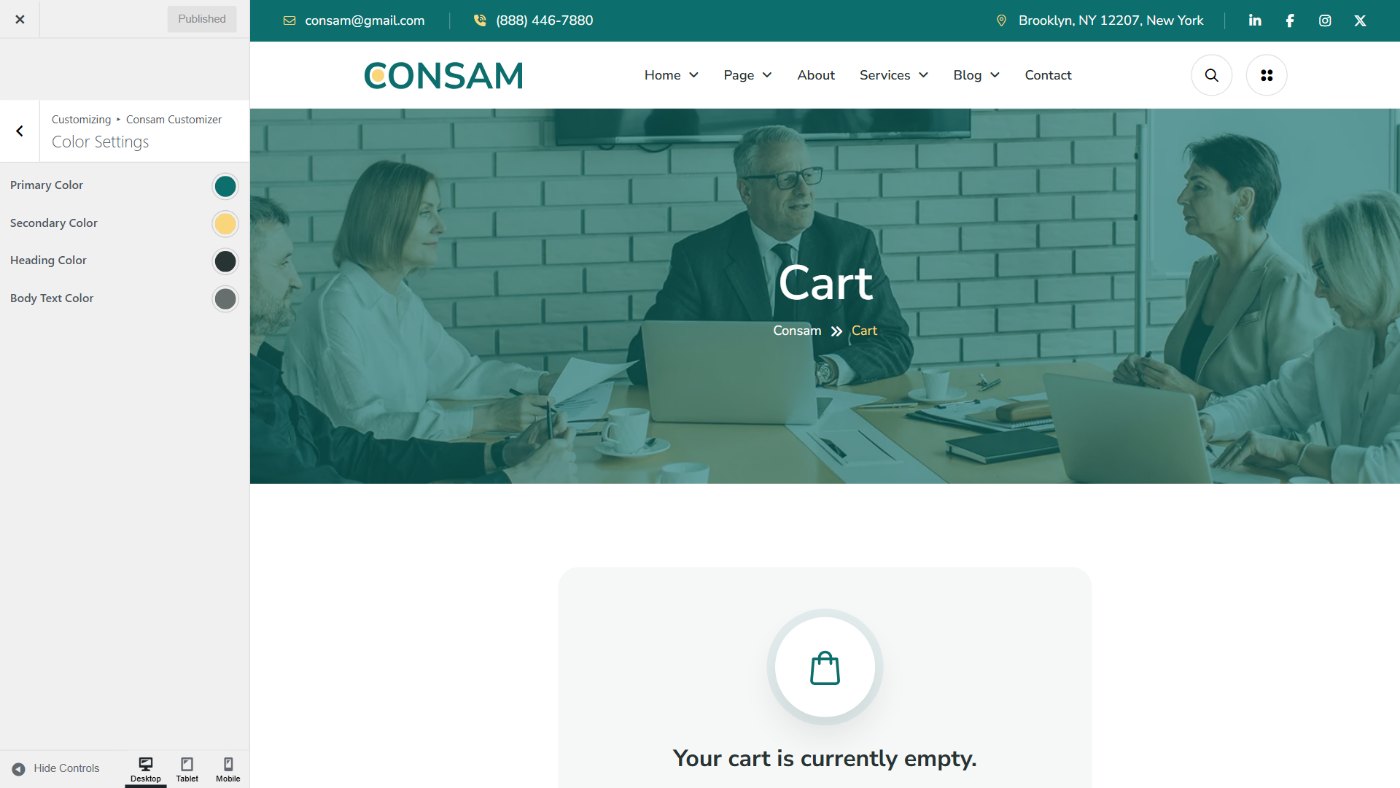
Navigate to DashboardAppearanceCustomizeConsam CustomizerColor Settings and follow these steps:
Primary Color (green, #0C6E6D), Secondary Color (yellow, #F9D67B), Heading Color and Body Text Color. They change the whole site, the Elementor widgets included.
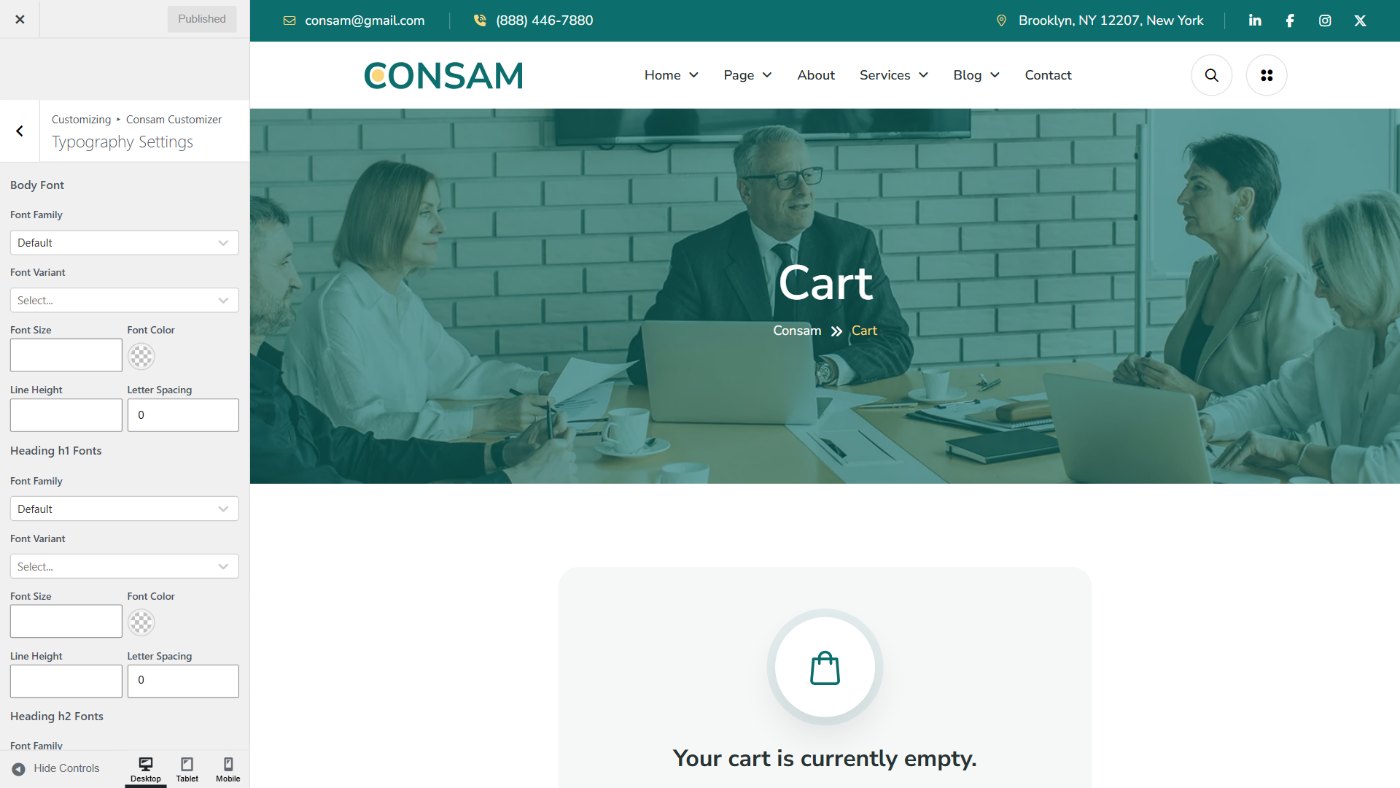
Navigate to DashboardAppearanceCustomizeConsam CustomizerTypography Settings and follow these steps:
Body Font and Heading h1–h6 Fonts: font family, weight, size, line height and letter spacing. Leave a field empty to keep the theme font (Nunito Sans).
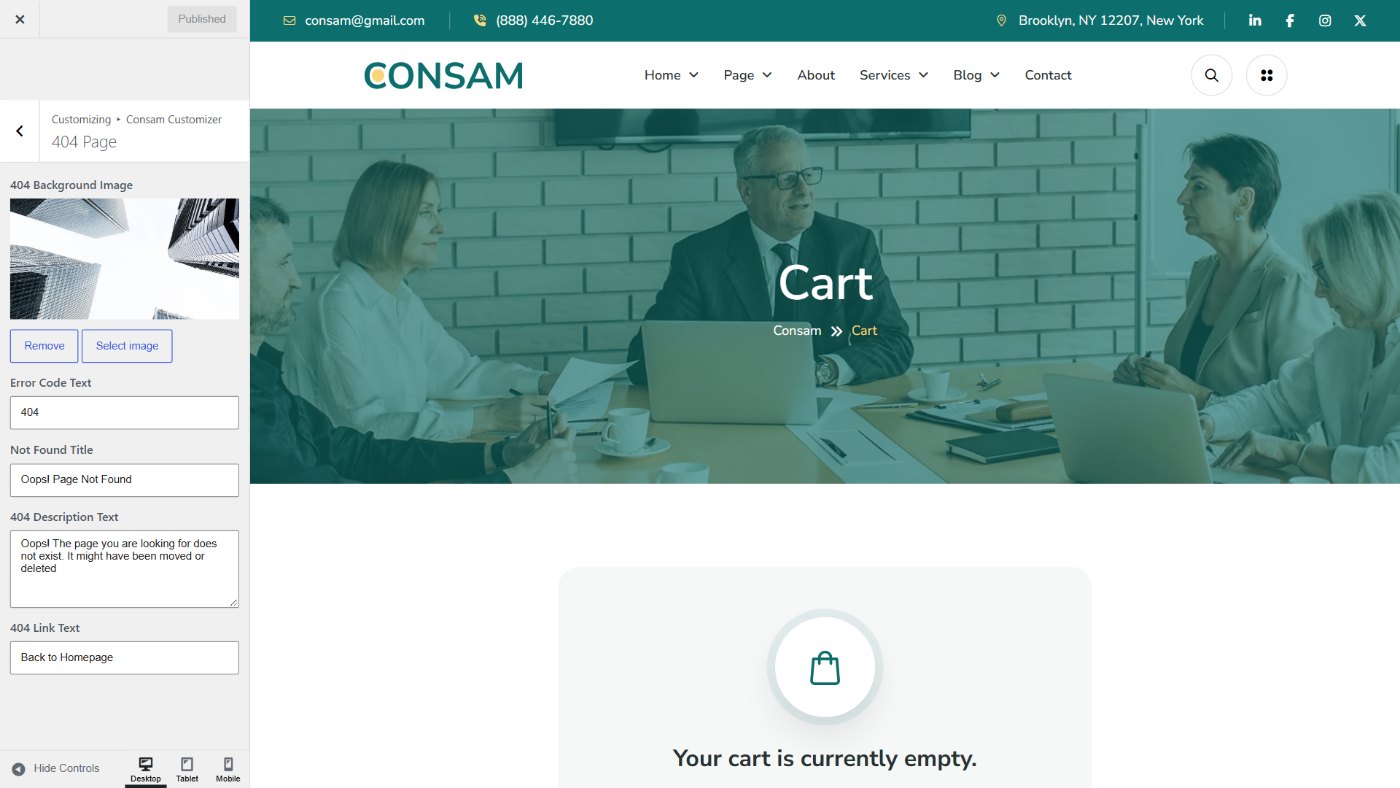
Navigate to DashboardAppearanceCustomizeConsam Customizer404 Page and follow these steps:
404 Background Image, Error Code Text, Not Found Title, 404 Description Text and 404 Link Text of the “page not found” page.
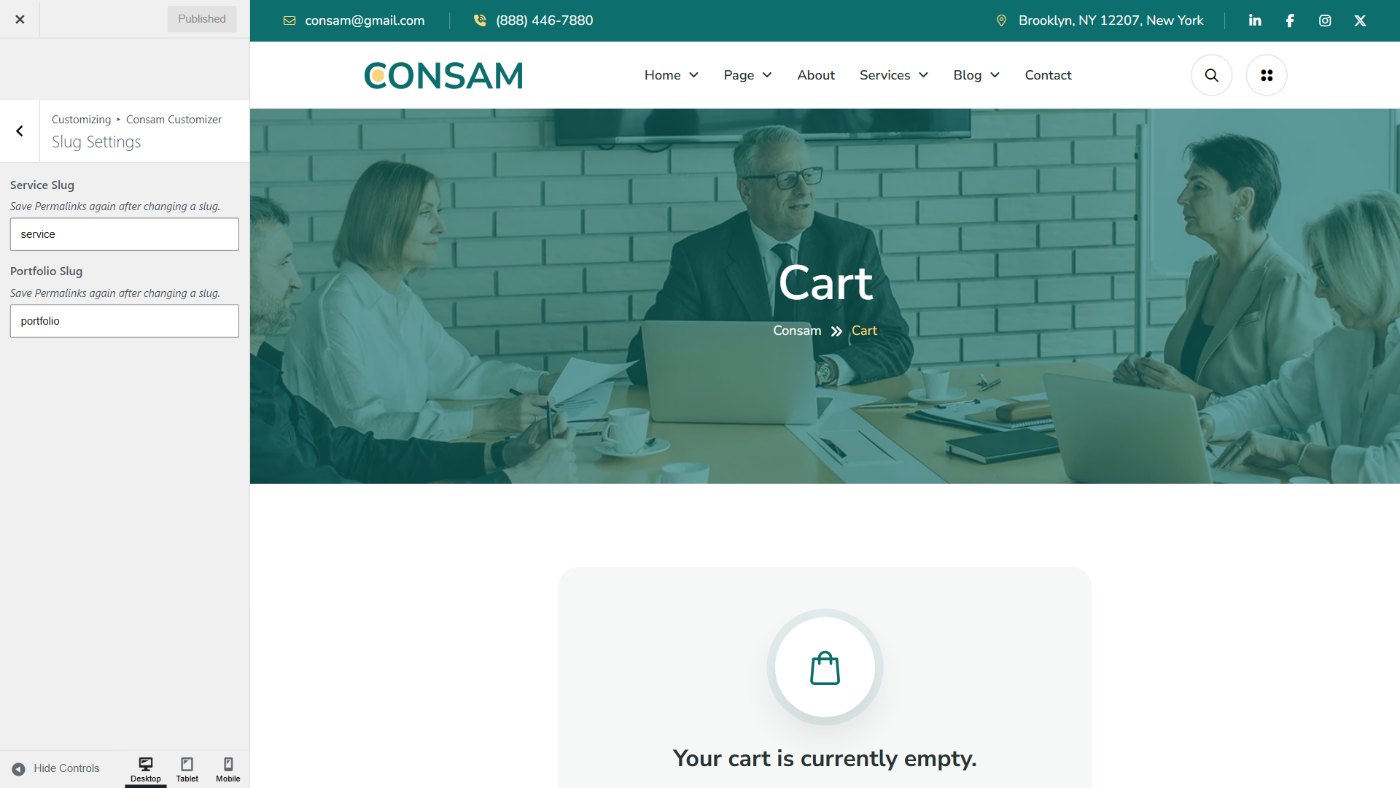
Navigate to DashboardAppearanceCustomizeConsam CustomizerSlug Settings and follow these steps:
Service Slug and Portfolio Slug: the word in the address of service and portfolio pages (for example /services/strategic-planning/). After a change, open Settings → Permalinks and click Save Changes.
Consam lets you design the header, footer, breadcrumb (page title area), mega menu and offcanvas panel with Elementor, using the Generic Elements For Elementor plugin. The demo import adds ready templates for all of them, so you can start by editing those.
Every part works the same way, in three steps:
1CreateGeneric Elements → Generic Templates → Create Template. Pick the type and design it in Elementor.2Use it on the whole siteCustomizer → Consam Customizer → Header, Footer or Breadcrumb Settings.3Change it on one pageEdit the page → “Header, Footer & Breadcrumb” box → Elementor → pick a template.
Mega menus and the offcanvas panel are placed a little differently:
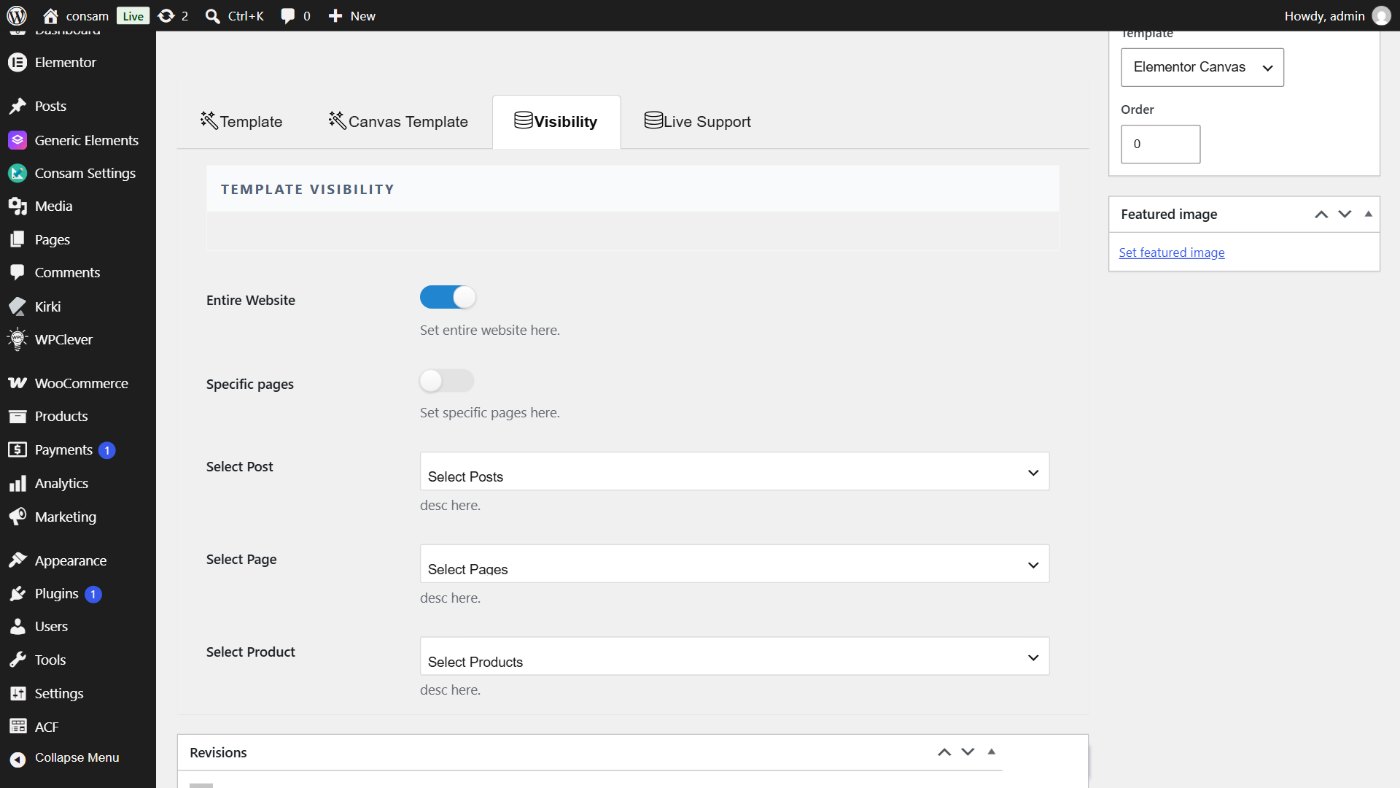
Part Whole site One page Guide Header Customizer → Header Settings Page box → Header Header Footer Customizer → Footer Settings Page box → Footer Footer Breadcrumb Customizer → Breadcrumb Settings Page box → Breadcrumb (or Page Info to hide it) Breadcrumb Mega Menu Appearance → Menus → menu item → Mega Menu – Mega Menu Offcanvas Template → Visibility → Entire Website Template → Visibility → Specific pages Offcanvas
After the demo import these templates are in Generic Elements → Generic Templates, already in use:
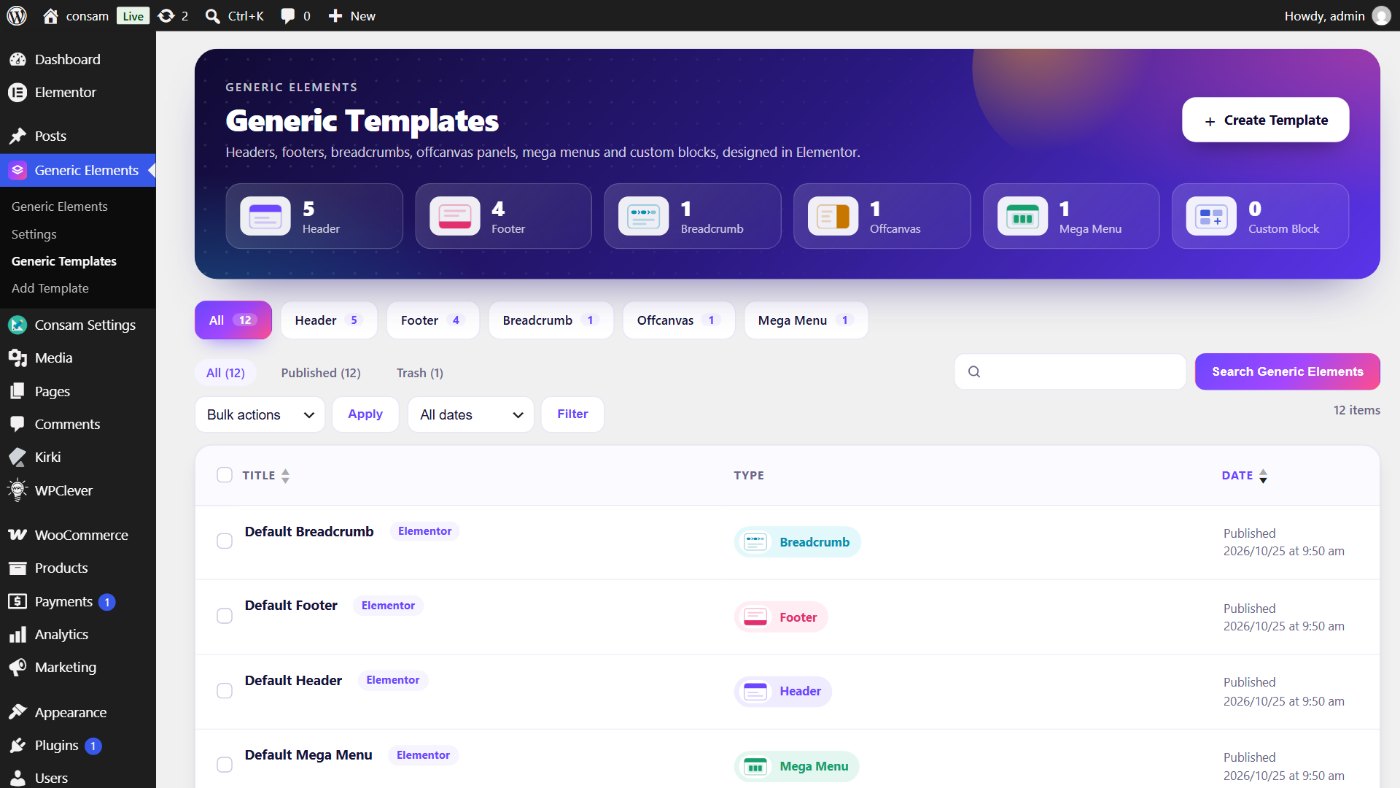
Navigate to DashboardGeneric ElementsGeneric TemplatesCreate Template and follow these steps:
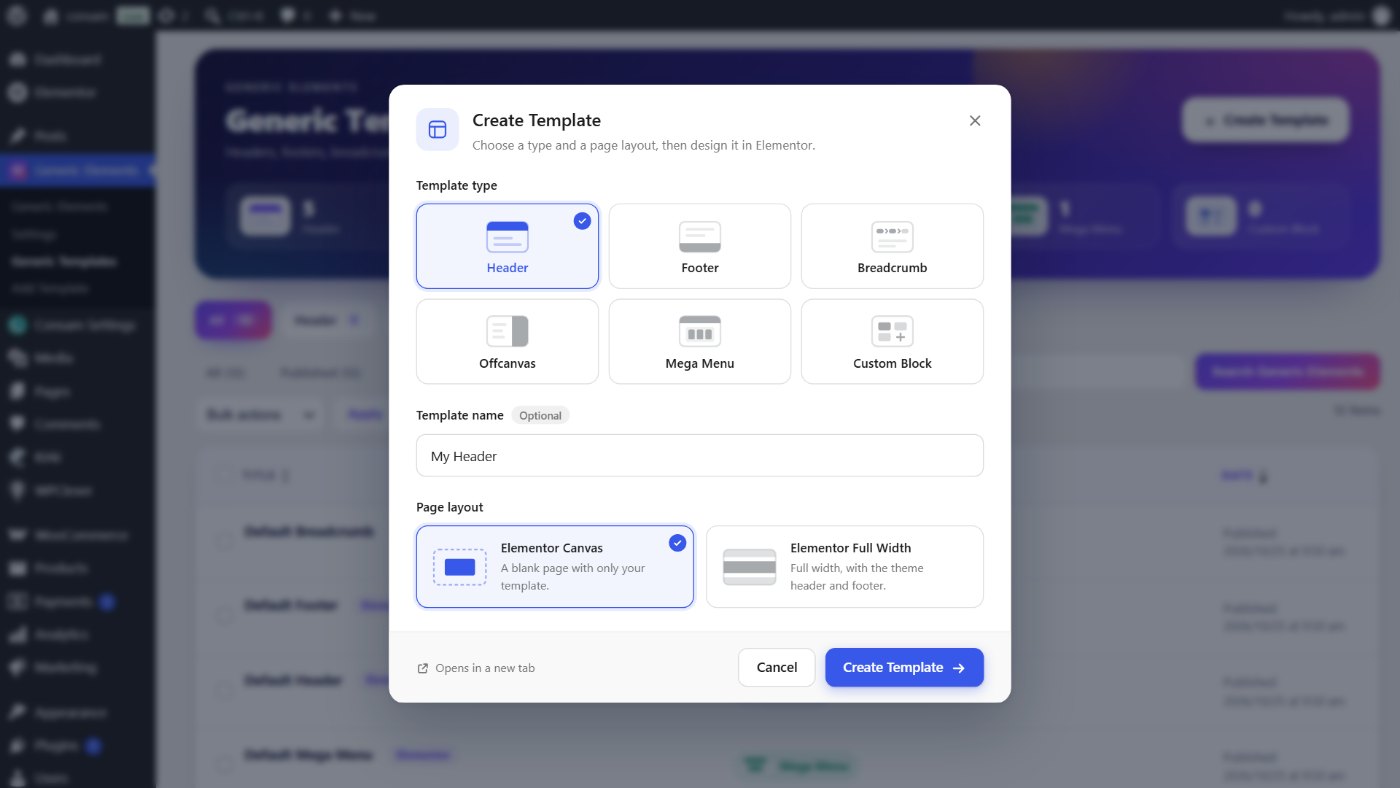
For the header, the footer and the breadcrumb, the theme checks three places in this order and uses the first one that is set:
1. The page’s own settingHeader, Footer & Breadcrumb box2. The CustomizerDefault/Elementor switch on3. The theme designwhen nothing else is set
A template that is deleted, moved to the trash or saved as a draft is skipped, so the page falls back to the next place. Nothing breaks.
Navigate to DashboardGeneric ElementsGeneric Templates and follow these steps:
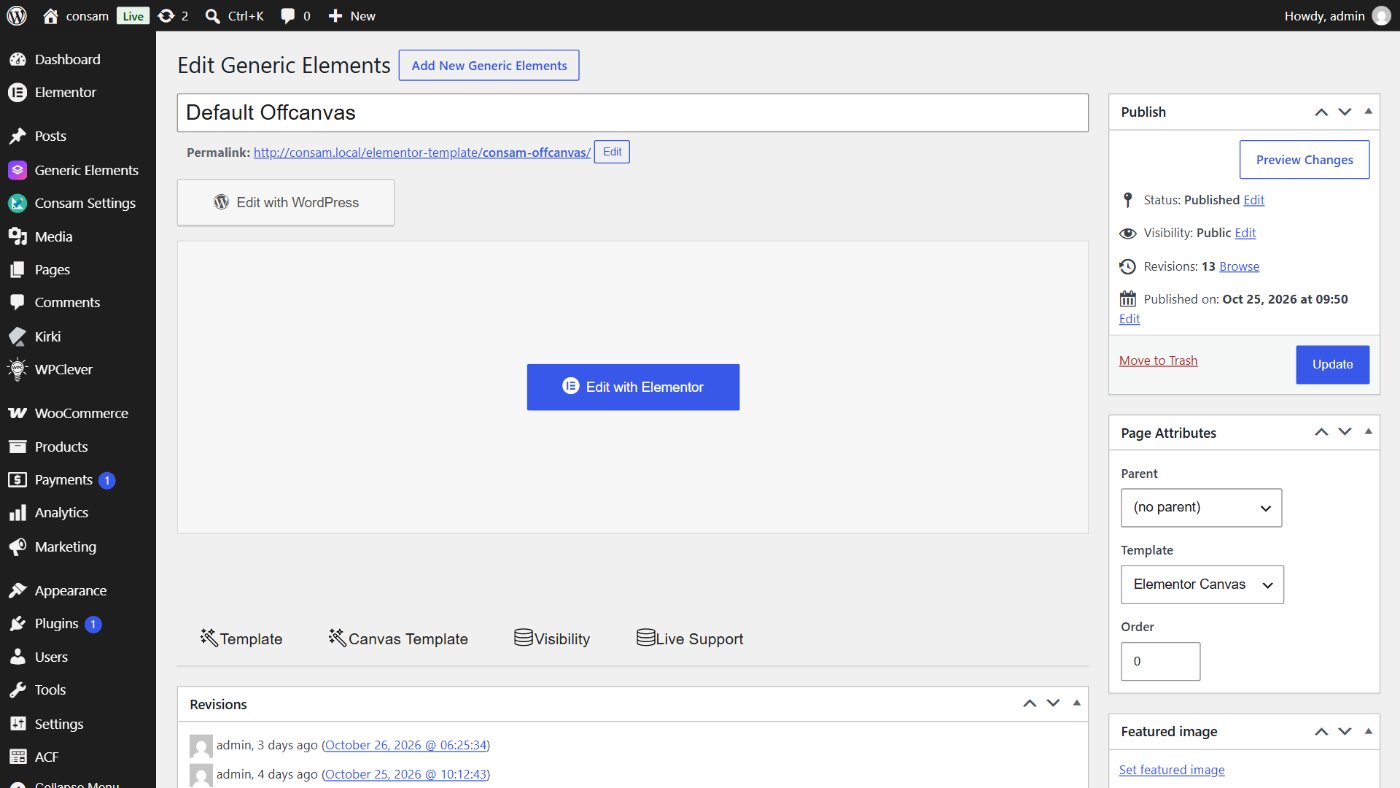
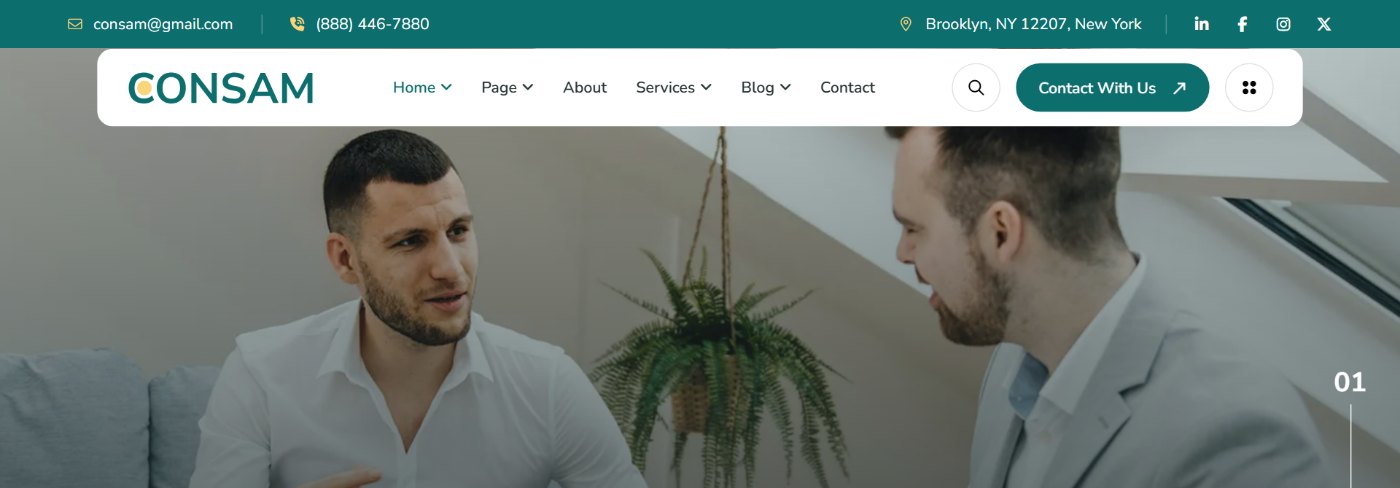
Build the header (logo, menu, search, buttons, top bar) with Elementor, use it on every page, and give some pages a different one. Watch the video, or follow the parts below.
Navigate to DashboardGeneric ElementsGeneric TemplatesCreate Template and follow these steps:
Tip: it is faster to start from the demo’s Default Header: edit it directly, or open it in Elementor and save it as a template (Publish arrow → Save as Template) to reuse its sections.
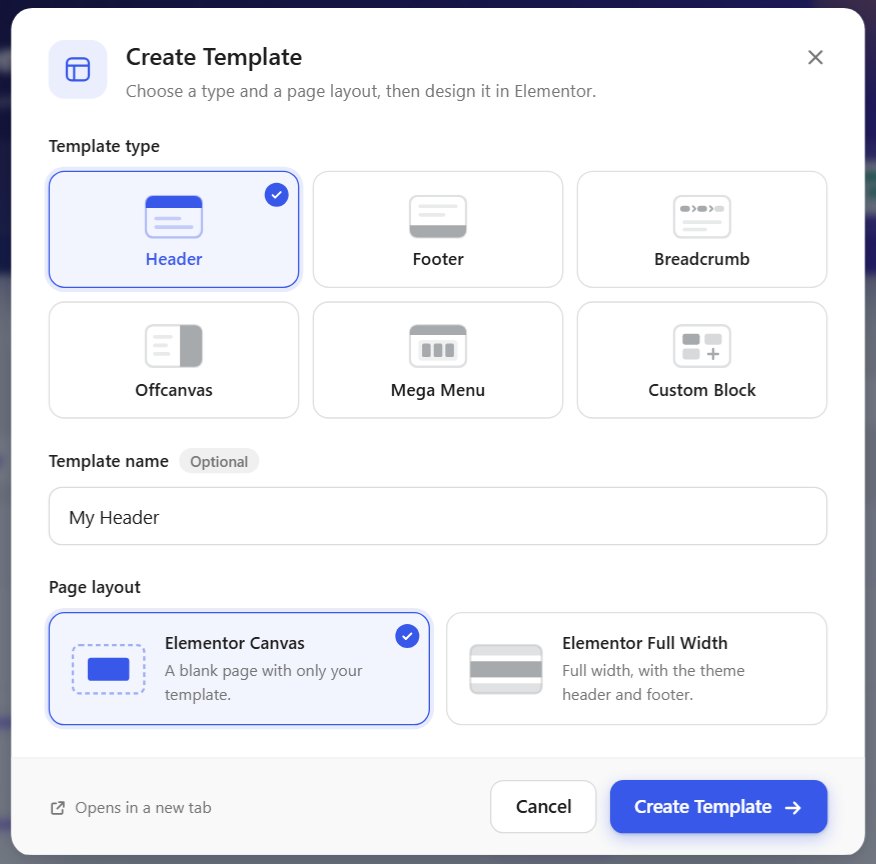
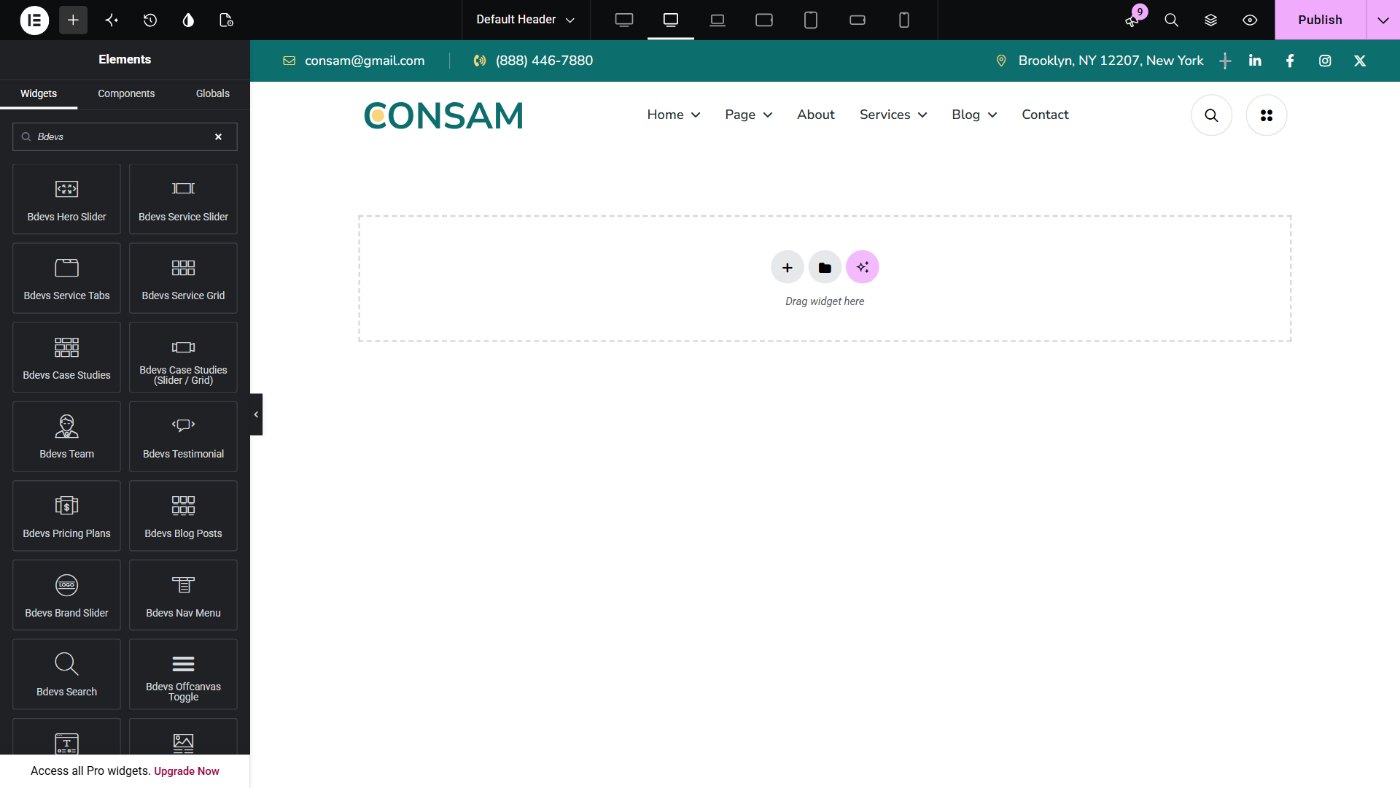
Build the header with containers (rows and columns) and widgets. Type Bdevs in the widget search to find the theme widgets made for headers:
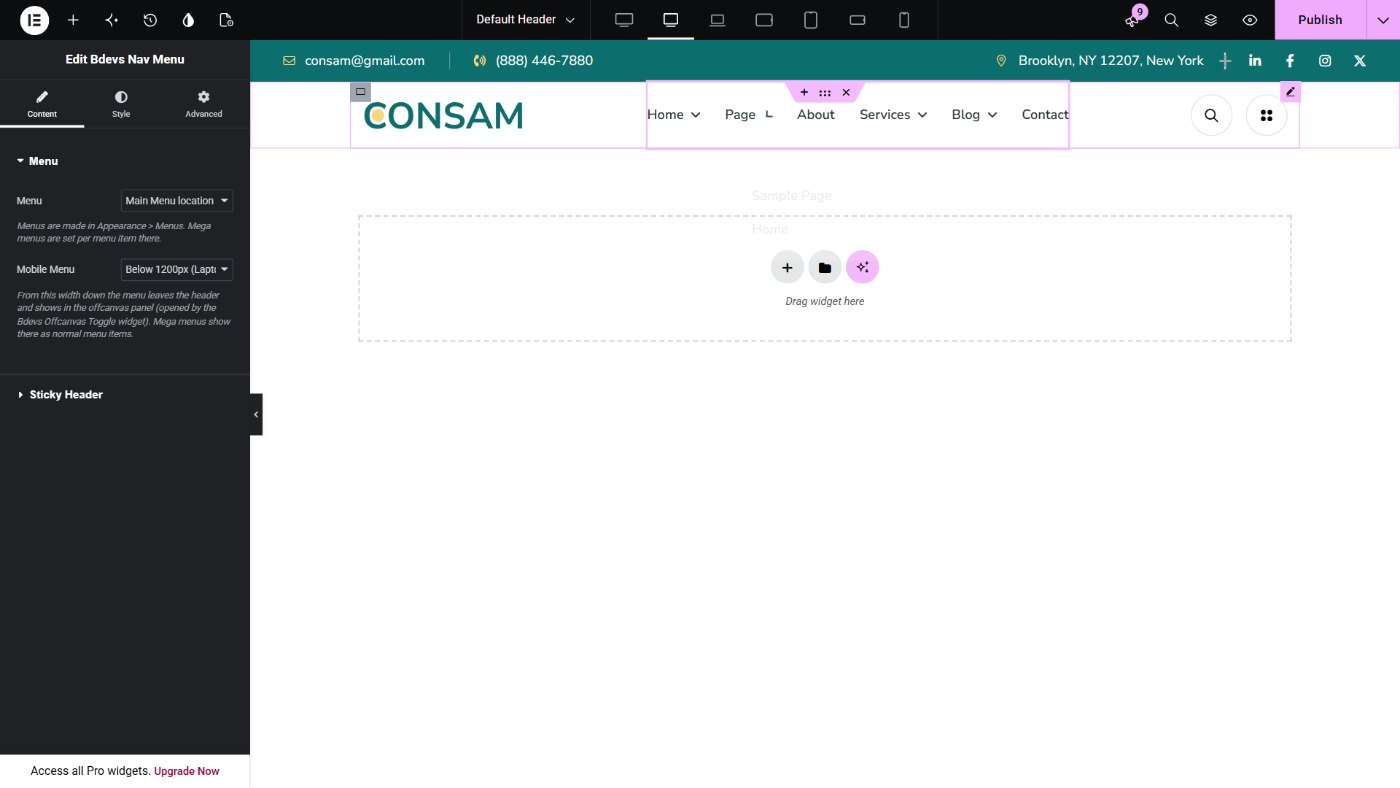
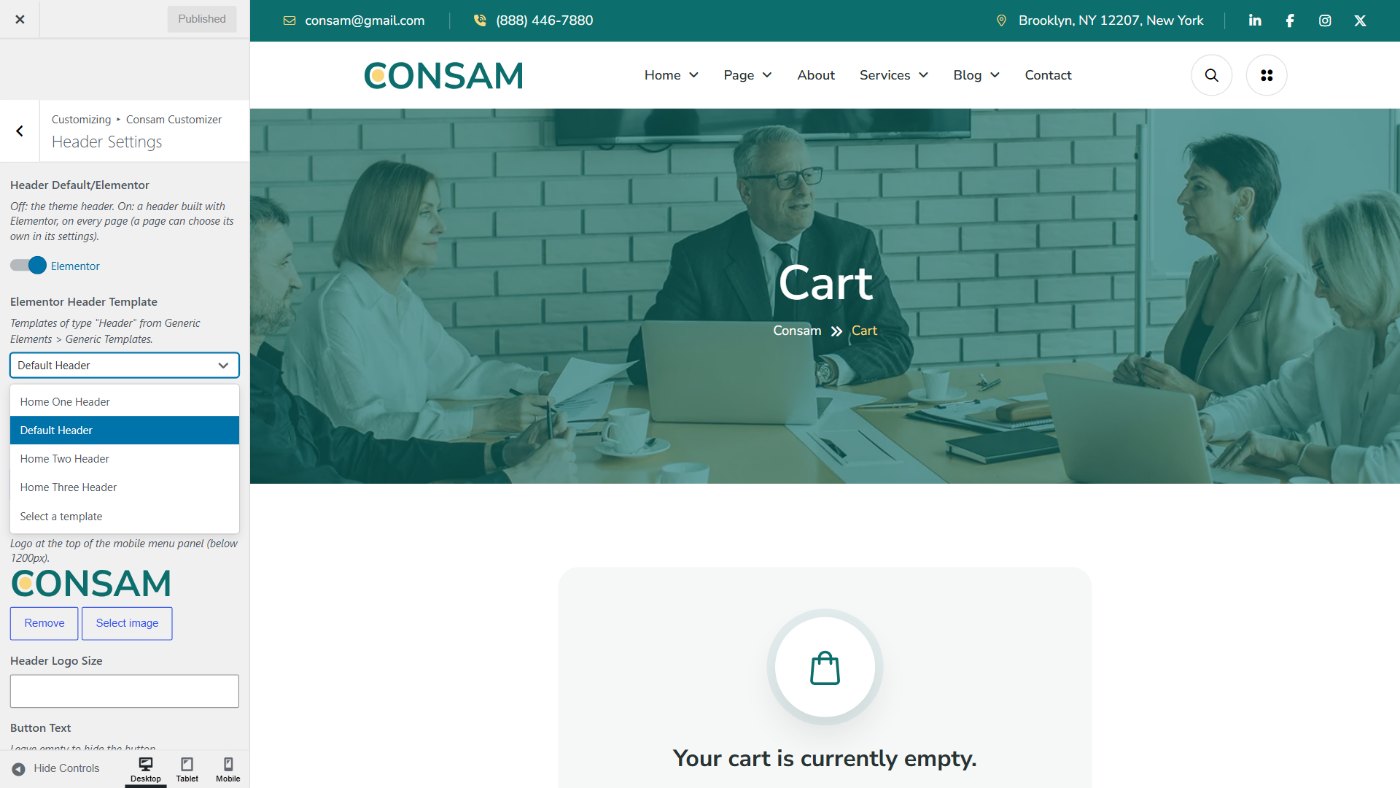
Navigate to DashboardAppearanceCustomizeConsam CustomizerHeader Settings and follow these steps:
Turn the switch off to go back to the theme’s default header (logo, menu and the Customizer button).
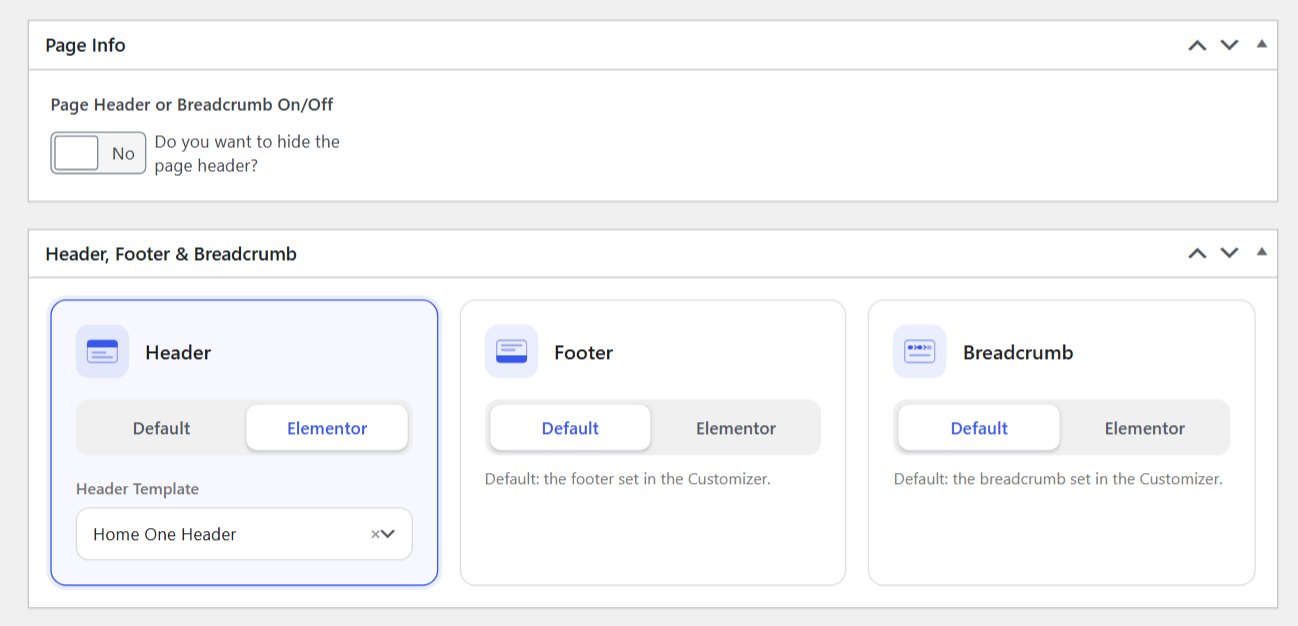
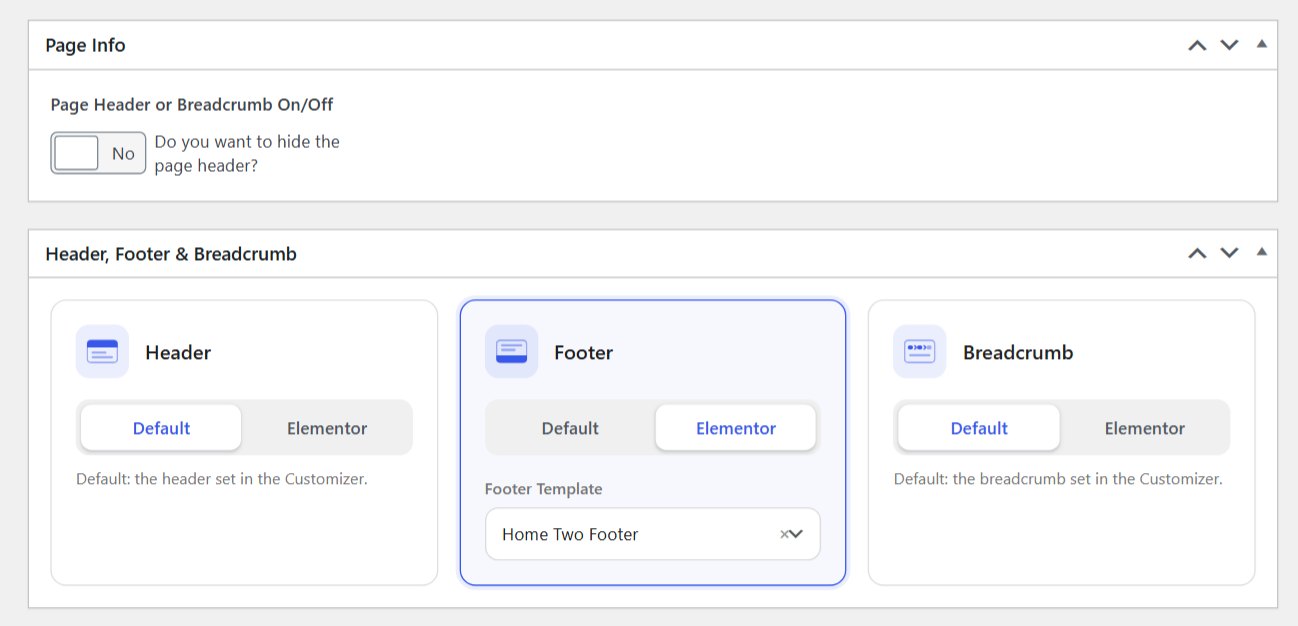
Navigate to DashboardPagesEdit a pageHeader, Footer & Breadcrumb and follow these steps:
Click Default in the card to use the Customizer header again. This is how the demo home pages get their own headers.
The menu items themselves are edited in Appearance → Menus, not in the header template.
Build the footer (logo, text, address, links, subscribe form, copyright) with Elementor, use it everywhere, and give some pages a different one.
Navigate to DashboardGeneric ElementsGeneric TemplatesCreate Template and follow these steps:
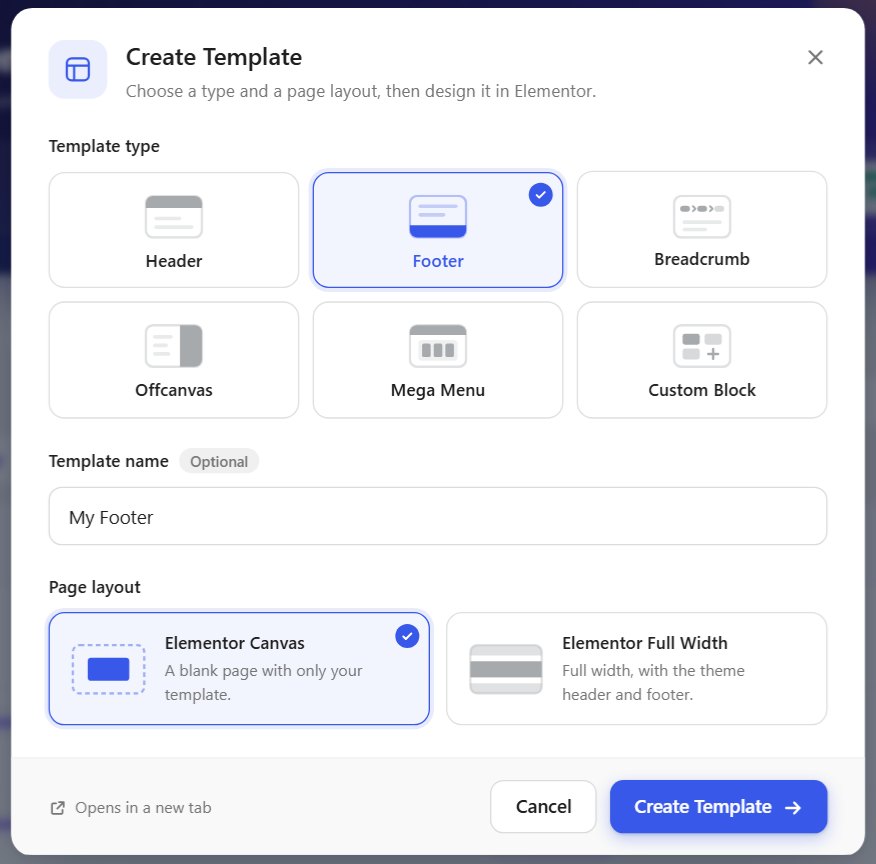
[contact-form-7 title="Footer Subscribe" html_class="bd-footer-subscribe"]. The demo includes the “Footer Subscribe” and “Footer Newsletter” forms (Contact → Contact Forms).[bdevs_year] in the text to always show the current year, for example Copyright [bdevs_year] Consam.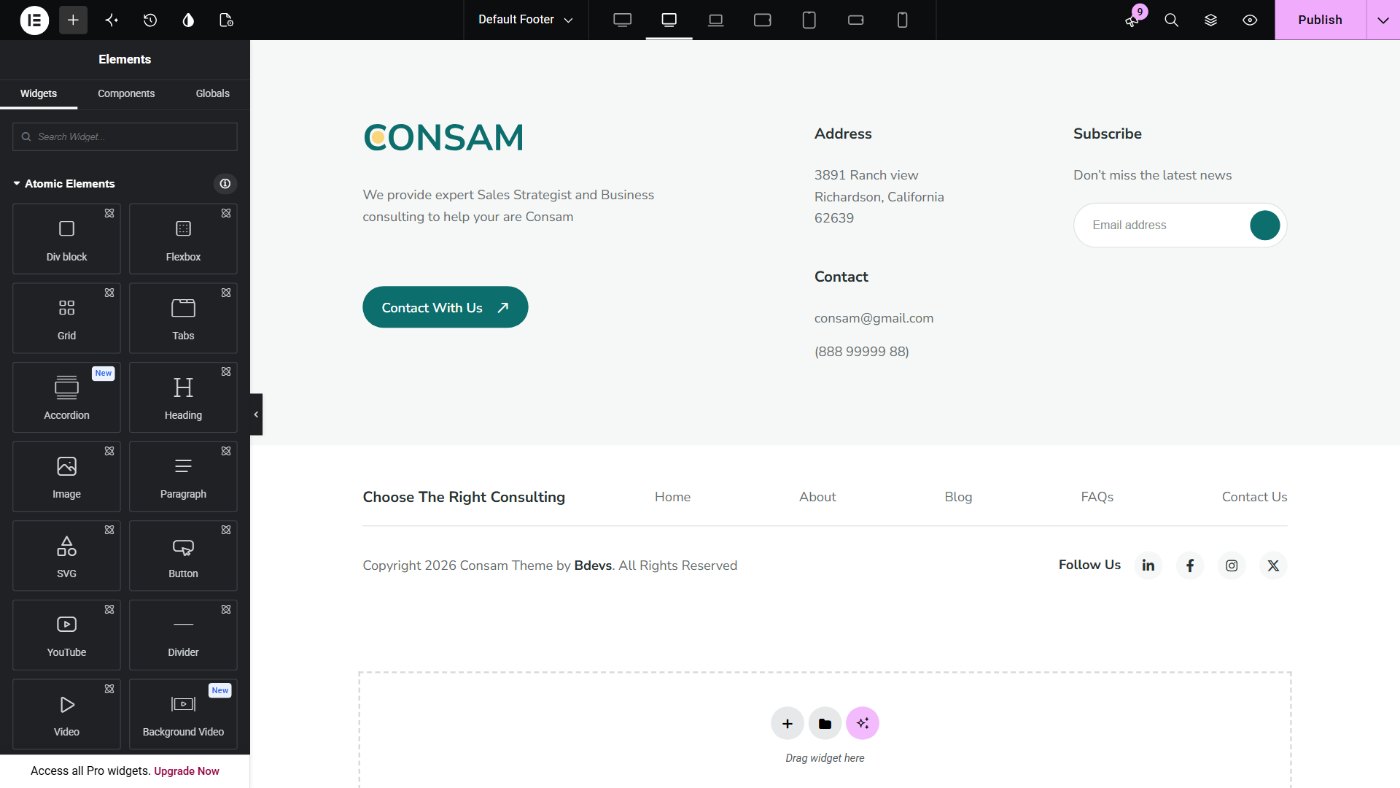
Navigate to DashboardAppearanceCustomizeConsam CustomizerFooter Settings and follow these steps:
With the switch off, the theme shows its simple default footer with the Copy Right text.
Navigate to DashboardPagesEdit a pageHeader, Footer & Breadcrumb and follow these steps:
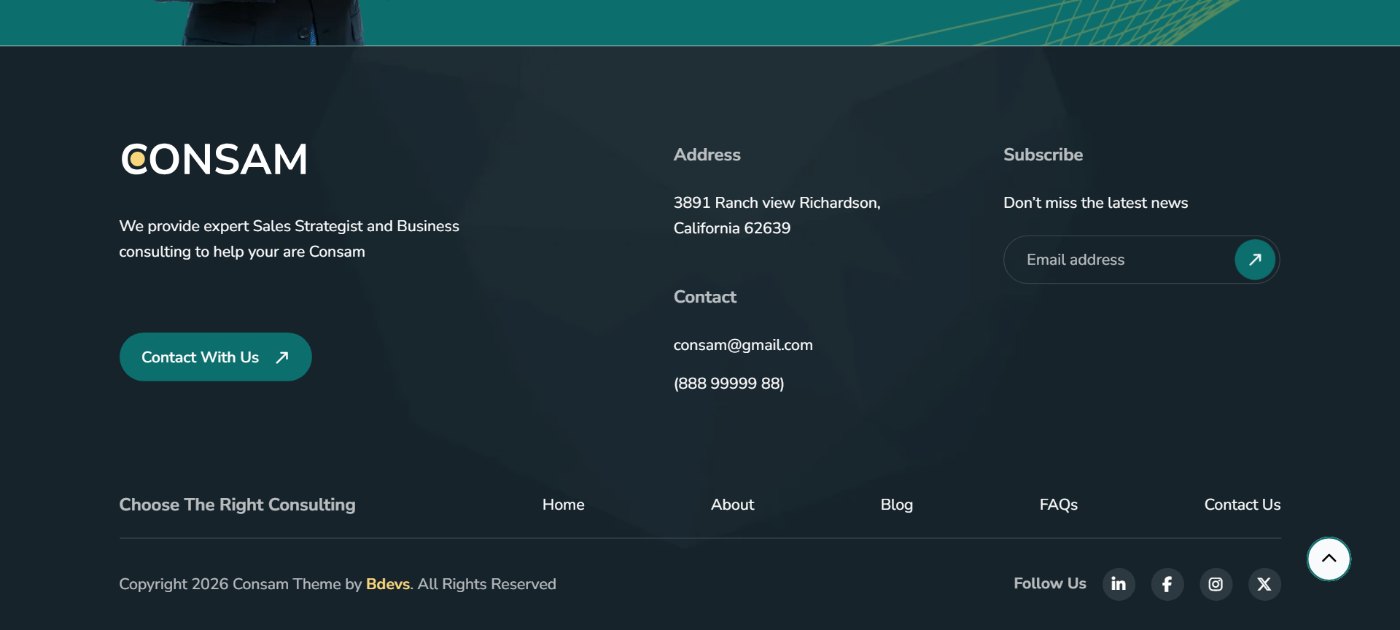
The demo uses this for the Home Two / Home Three pages, and to show a call-to-action above the footer on the shop pages (the CTA Footer template).
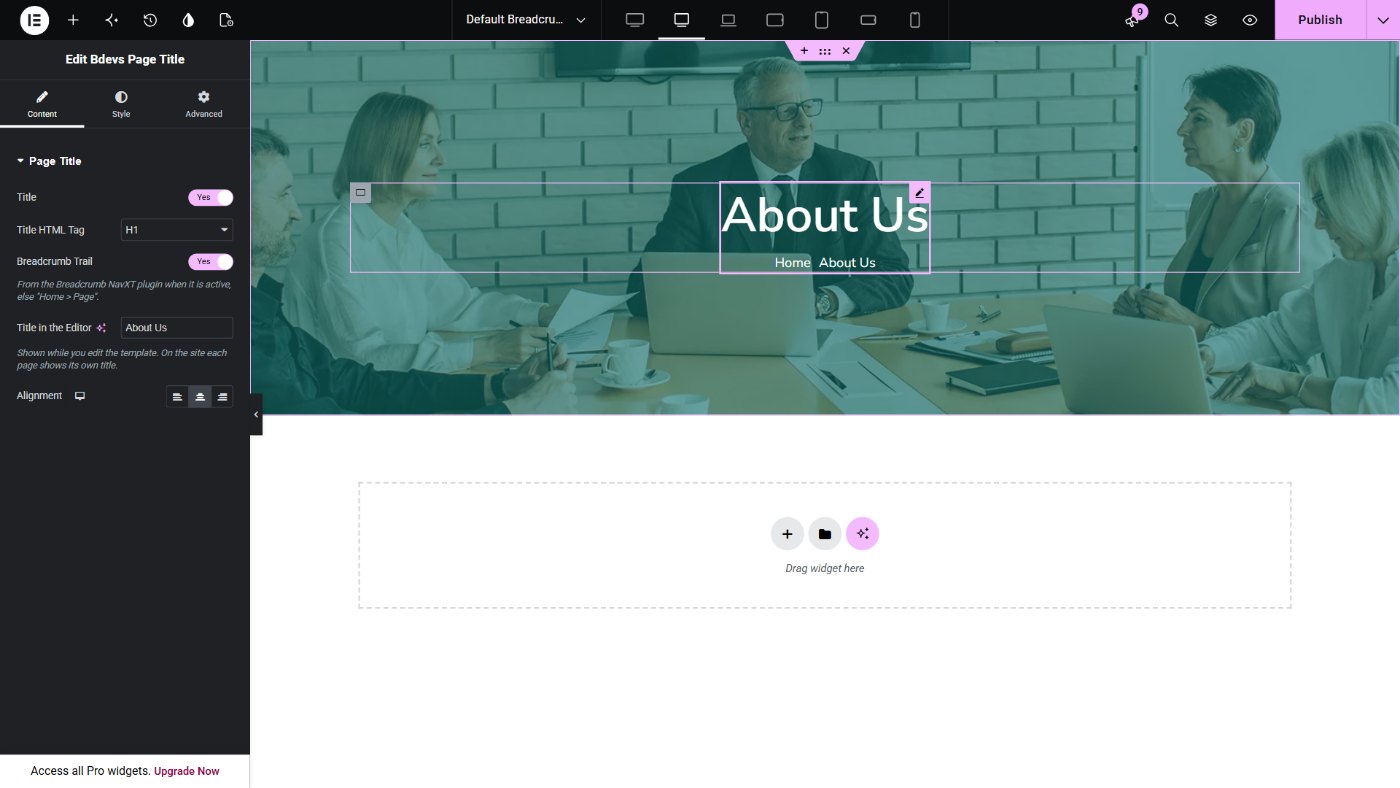
The breadcrumb is the page title area under the header (background image, page title and “Home » Page” trail). Build it once with Elementor: each page shows its own title in it automatically.
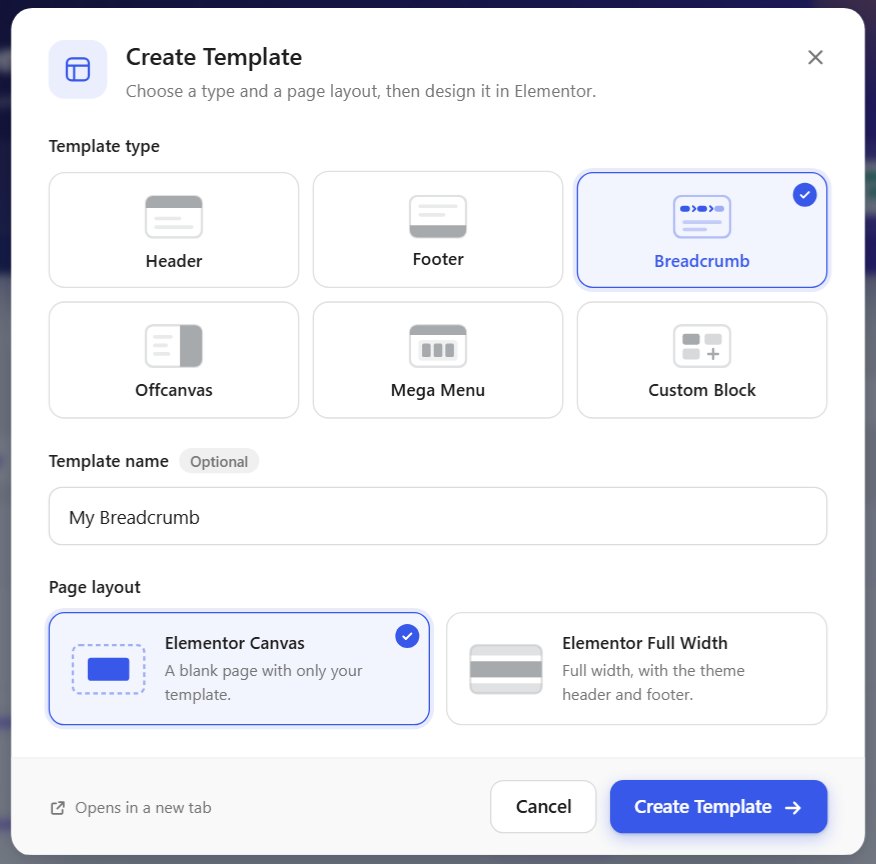
Navigate to DashboardGeneric ElementsGeneric TemplatesCreate Template and follow these steps:
The trail comes from the free Breadcrumb NavXT plugin when it is active (full trails for posts, categories and shop pages); without it the trail is “Home » Page”.
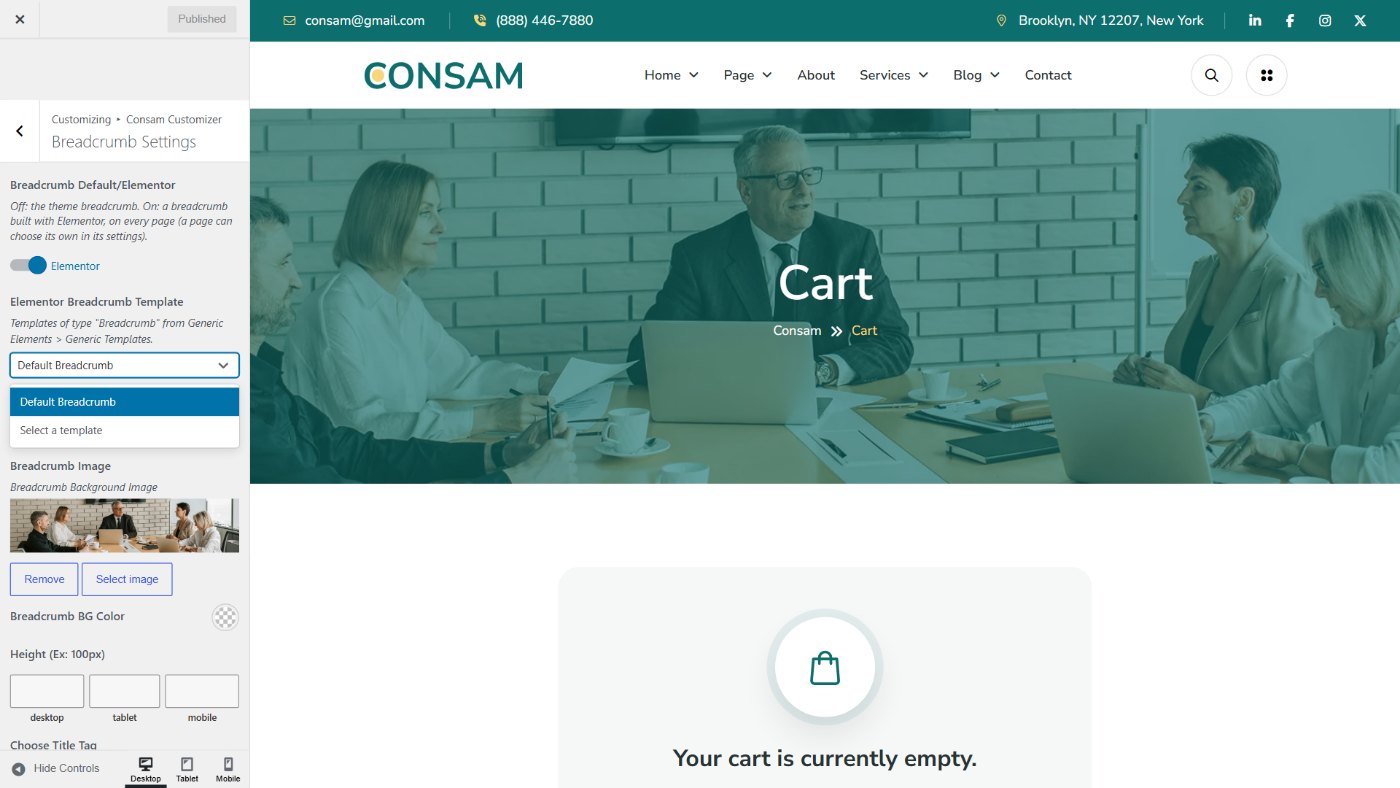
Navigate to DashboardAppearanceCustomizeConsam CustomizerBreadcrumb Settings and follow these steps:
Hide Breadcrumb in the same section hides the title area on every page, Elementor or not.
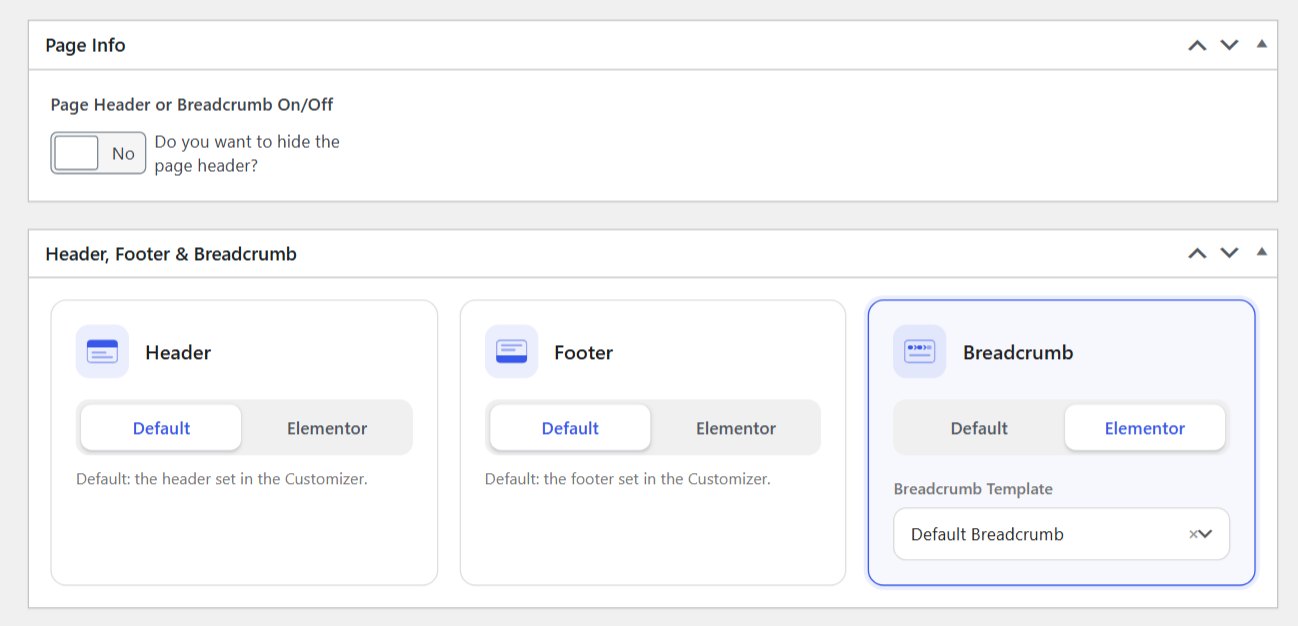
Navigate to DashboardPagesEdit a page and follow these steps:
Posts have the same hide switch in their Post Settings box.
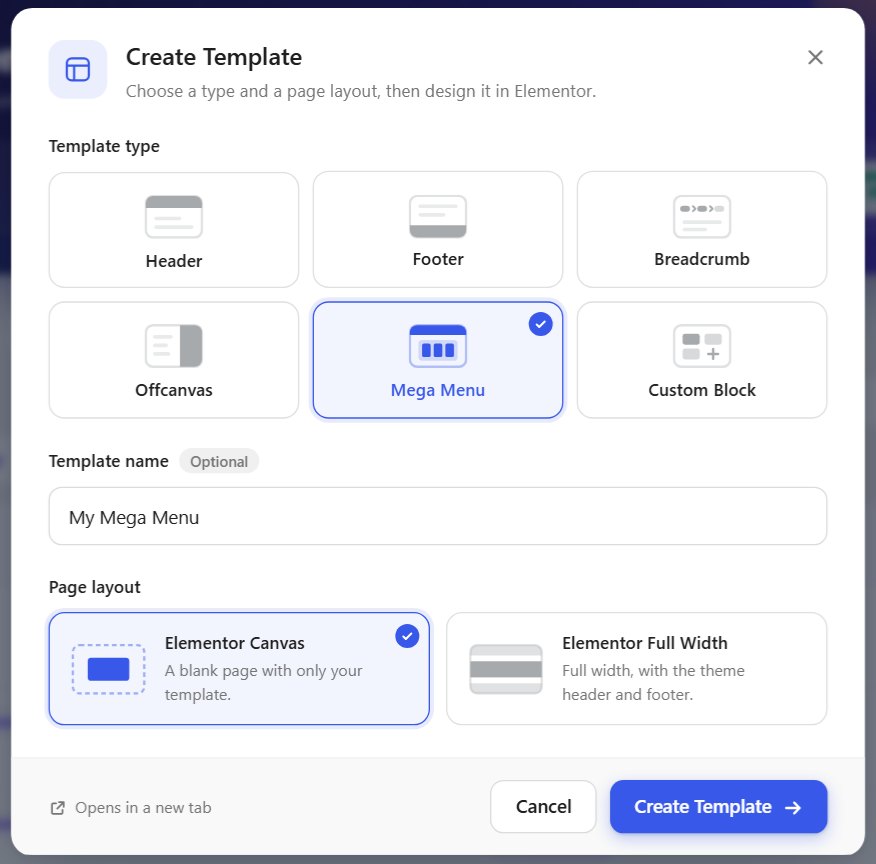
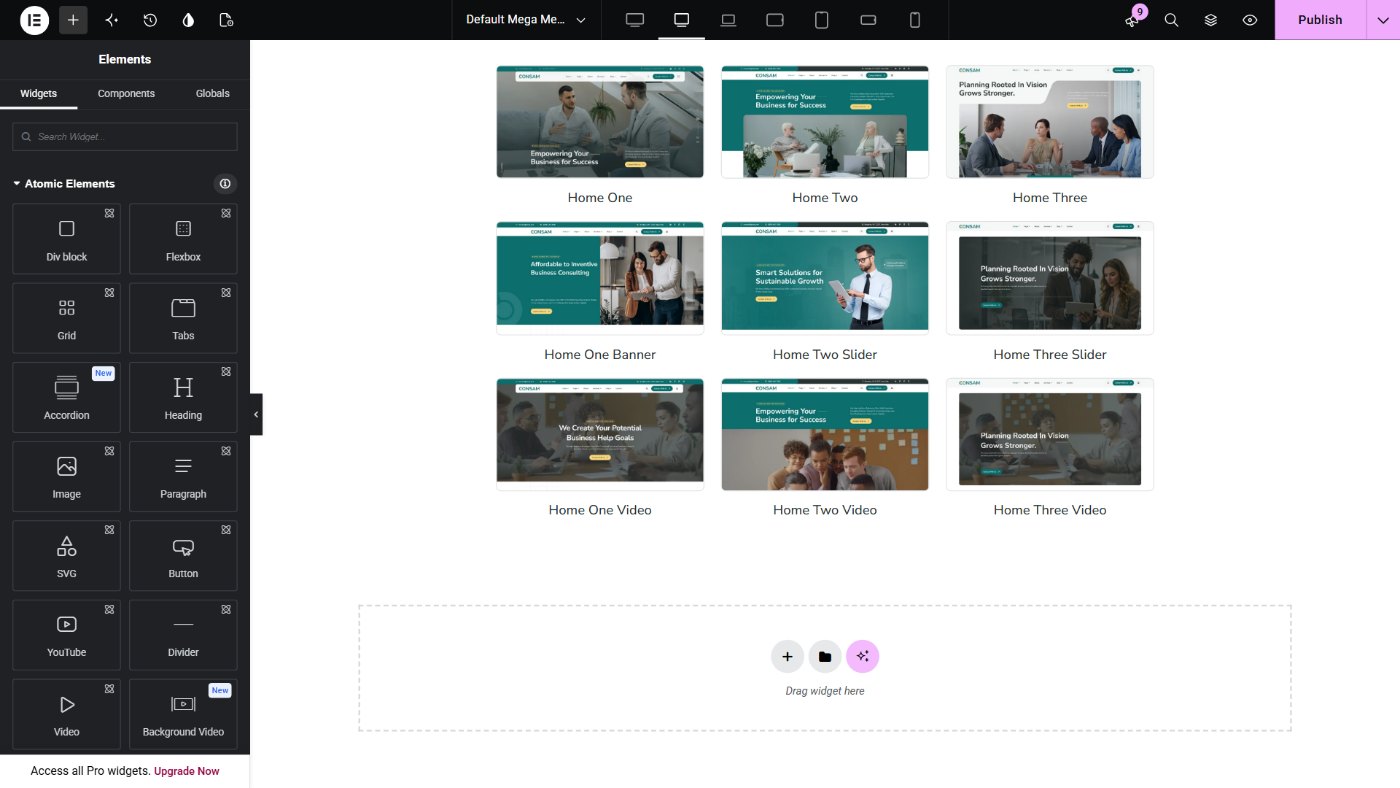
A mega menu is a large panel that opens under a menu item, with columns, images and links. In the demo the “Home” item shows the 9 home pages.
Navigate to DashboardGeneric ElementsGeneric TemplatesCreate Template and follow these steps:
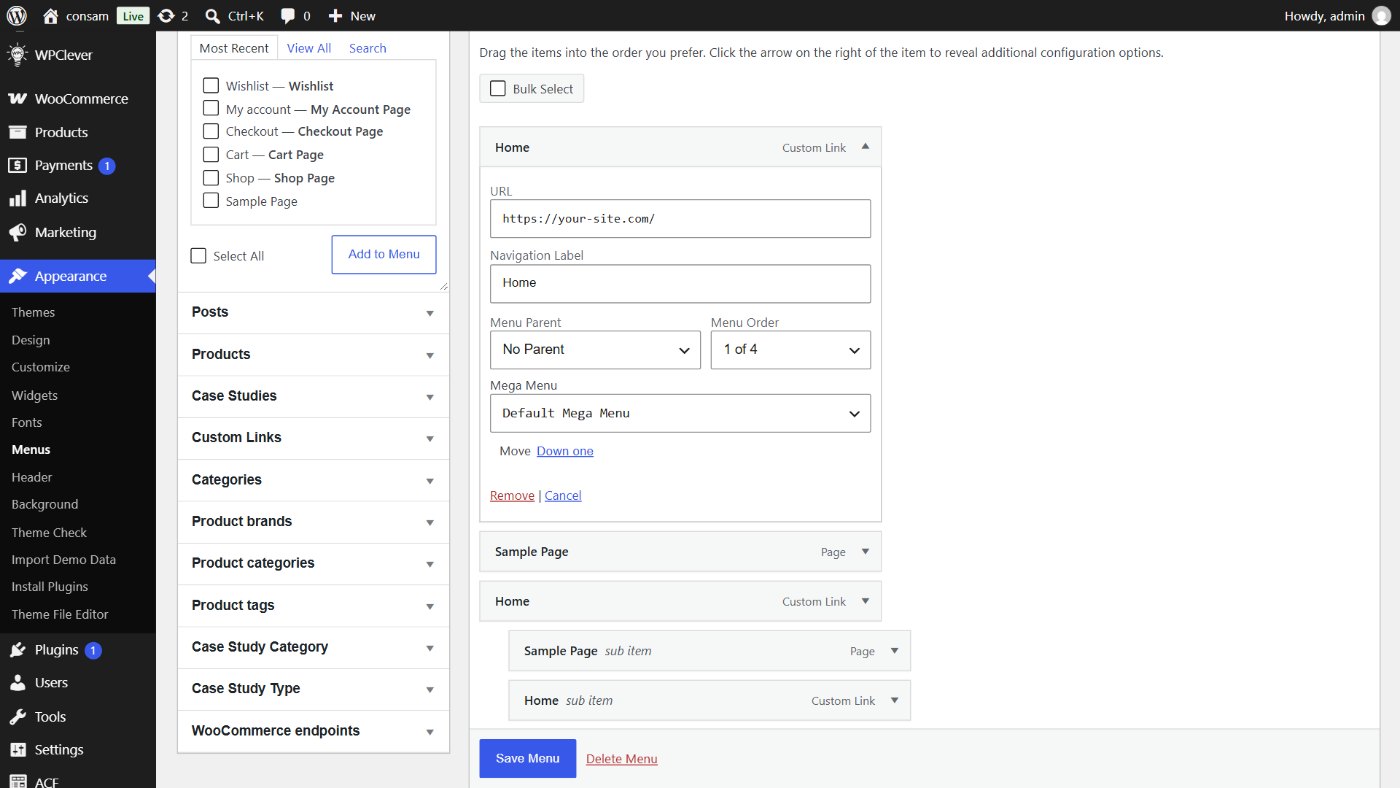
Navigate to DashboardAppearanceMenus and follow these steps:
To remove it, choose Select A Menu in the same field and save.
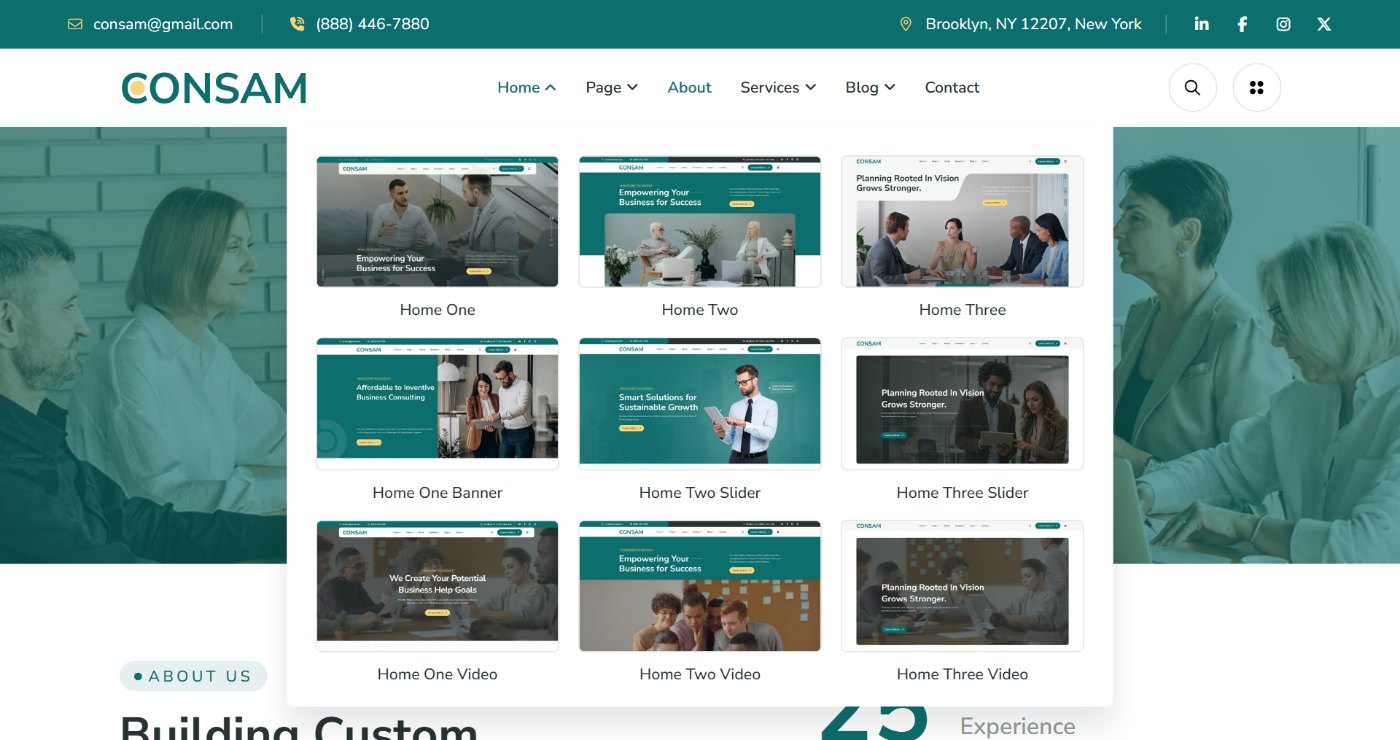
The offcanvas is the panel that slides in from the right when the round toggle button is clicked. It shows your template (about text, contact info, social links) and, on phones and tablets, the main menu.
Navigate to DashboardGeneric ElementsGeneric TemplatesCreate Template and follow these steps:
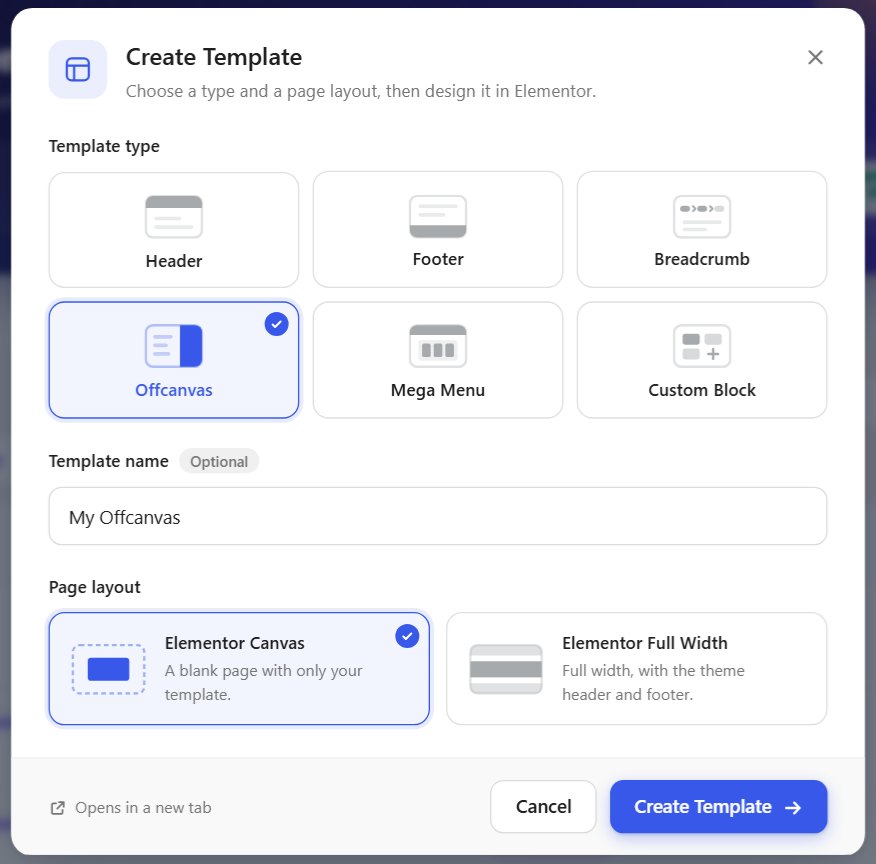
The logo and the close button at the top of the panel come from the theme. Change that logo in Header Settings → Mobile Menu Logo.
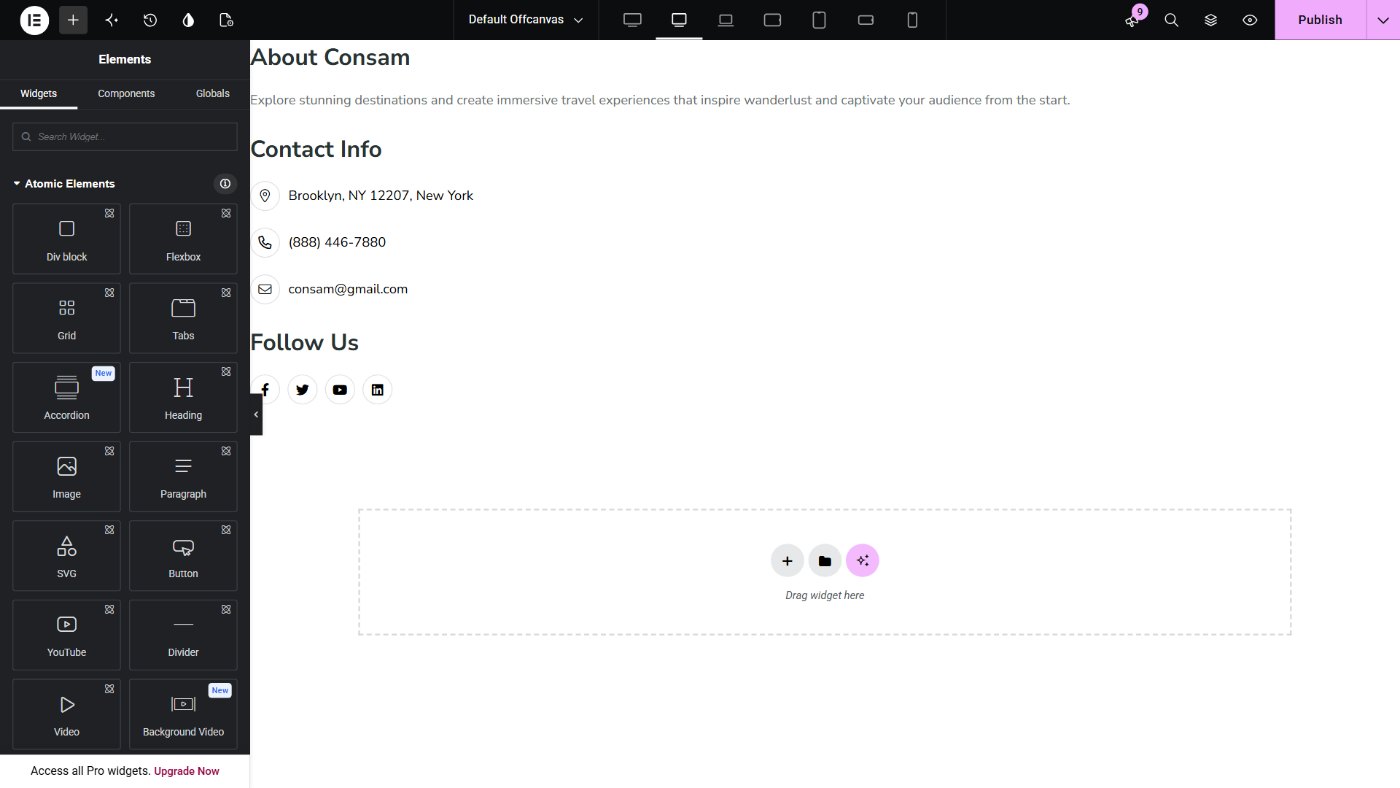
Navigate to DashboardGeneric ElementsGeneric TemplatesEdit the templateVisibility and follow these steps:
sidebar-toggle also opens the panel.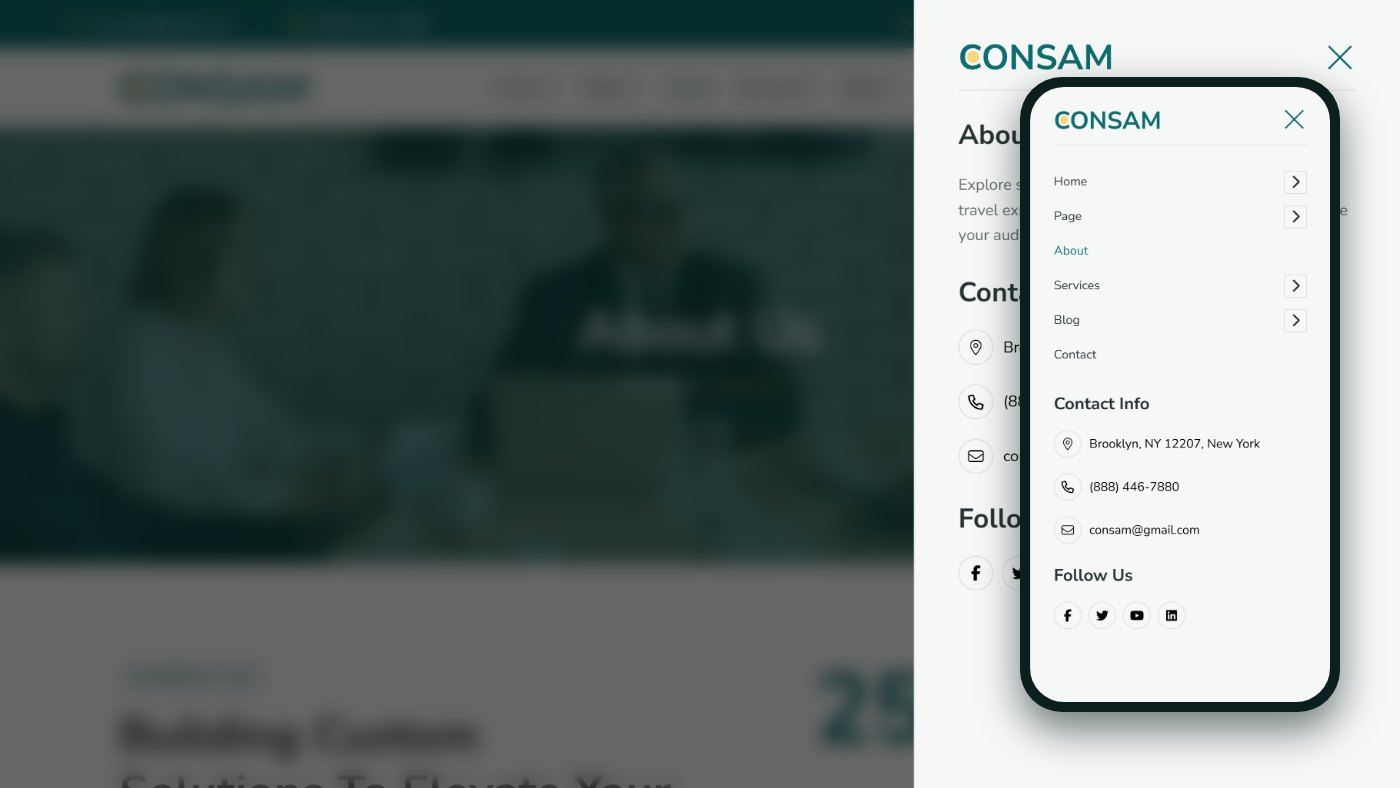
Navigate to DashboardAppearanceMenus and follow these steps:
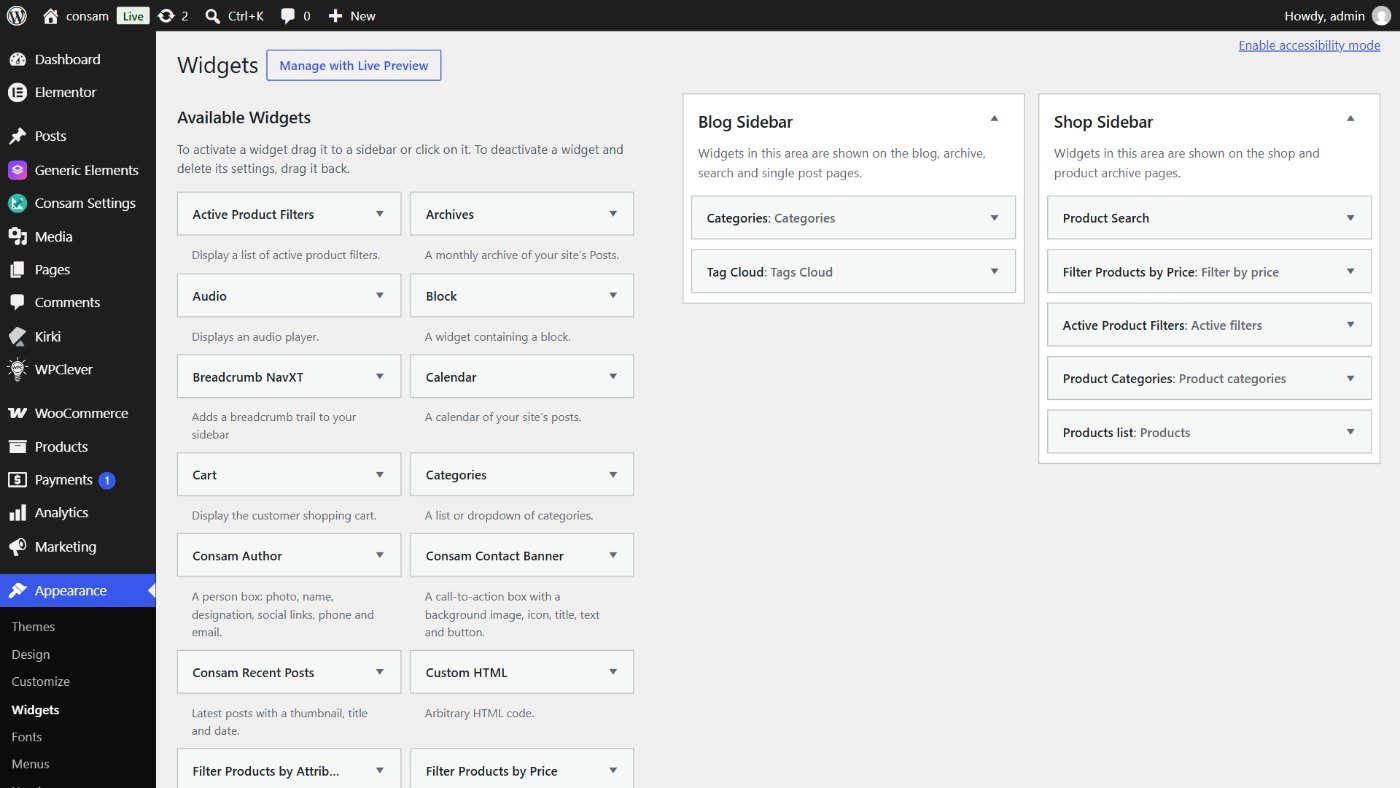
Navigate to DashboardAppearanceWidgets and follow these steps:
Drag widgets into these areas:
Navigate to DashboardPagesEdit a page and follow these steps:
Page Header or Breadcrumb On/Off: set it to Yes to hide the page title area on this page. The box shows on pages and WooCommerce products.

Navigate to DashboardPagesEdit a page and follow these steps:
Choose a different Elementor header, footer or breadcrumb for this page only (pages and WooCommerce products). Default uses the Customizer setting. See Header, Footer and Breadcrumb.
Navigate to DashboardPostsEdit a post and follow these steps:
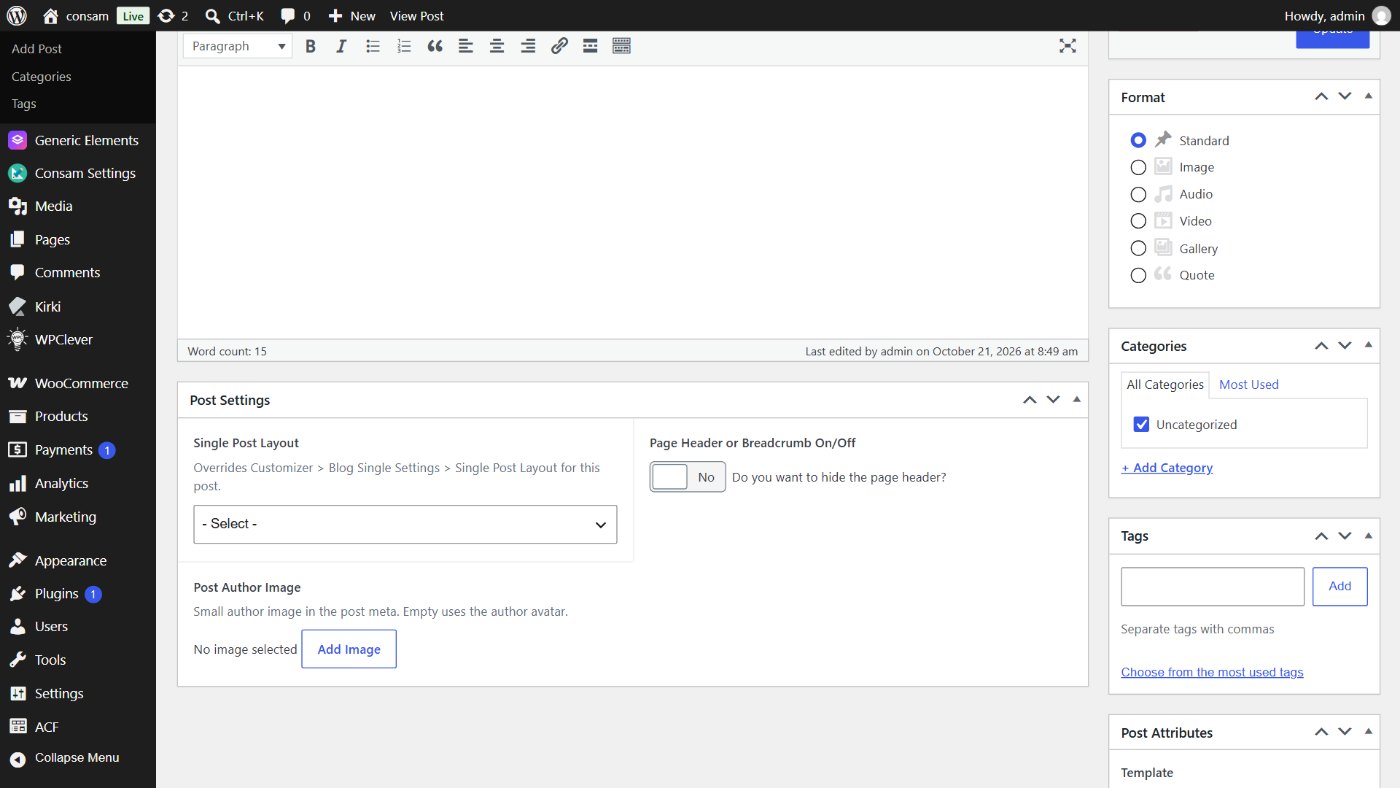
Choose a format in the post’s Format box. Supported formats: standard, image, audio, video, gallery and quote.
<cite>.Edit a page and choose Page Sidebar in Page Attributes → Template to show the blog sidebar next to the content.
Navigate to PagesEdit with ElementorSearch “Bdevs” and follow these steps:
Drag a widget onto the page. The Content tab holds the text, images, links and items; the Style tab holds colors, fonts and spacing. Many widgets have a Design option that switches between the demo layouts. Sections such as about, counters, process, FAQ and contact are built with Elementor’s own widgets, so you can change them freely.
Service, case study and portfolio pages are built with Elementor too (Services → Edit with Elementor). These widgets read the current item:
Navigate to ElementorSite SettingsLayout and follow these steps:
The demo uses a content width of 1320px and these breakpoints: mobile 575, mobile extra 767, tablet 991, tablet extra 1199, laptop 1399 and widescreen 2400. They are imported with the demo; keep them so the sections line up.
Navigate to DashboardConsam SettingsServicesAdd New and follow these steps:
Add the title, a short excerpt and the featured image (820×450 px), pick a Service Category, then click Edit with Elementor to build the details page. Card Image, Card Icon and Card Title are used by the service widgets.
Navigate to DashboardConsam SettingsCase StudiesAdd New and follow these steps:
Same as services. Case Study Category sets the badges on the cards and Case Study Type the filter buttons of the grid (Portfolio page).
Navigate to DashboardConsam SettingsPortfolioAdd New and follow these steps:
Add the title, content and featured image, and pick a Portfolio Category. Portfolio pages can also be built with Elementor.
The demo import creates the Shop, Cart, Checkout, My account and Wishlist pages and sets them for you. Add products in Products → Add New (images 650×650 px look best).
Translate the theme and its plugins: Consam, Bdevs Toolkit and Bdevs Elementor.
The translation template is languages/consam.pot in the theme folder.
Put your own CSS in the child theme’s style.css and your PHP in its functions.php. Theme updates replace the parent theme, never the child theme, so your changes are kept. Templates, menus and Customizer settings are stored in the database and are kept too.
Open a ticket at support.bdevs.net with your purchase code. We answer within 24–48 hours on working days.
Support covers questions about the theme features, bugs in the theme, and help with the included plugins. It does not cover custom changes, third-party plugins or hosting problems. For custom work, e-mail [email protected].
Want the theme customized, or a custom theme or template? Our team can help.
Contact
Want the theme customized, or a custom theme or template? Our team can help.
Contact